
Process Sequence
Learn how to align ingredient addition order with your process design steps in Albert. This setup helps you organize ingredients according to the actual manufacturing sequence, define parameter groups in the process design grid, adjust them in Inventory, and then view the final sequence in a Batch Task.
📘 Overview
Albert allows you to align the order of ingredient addition directly with your process design steps. Instead of only documenting ingredient additions at a high level, you can define when each ingredient is added in relation to the individual process steps of your formulation. This helps create a clearer manufacturing sequence and supports consistency during execution.
This article explains how to prepare your product in the Worksheet, define parameter groups in the process design grid, and then adjust those parameter groups in Inventory so they reflect the actual process instructions for the formula.
👥 Who Is This For?
This feature is intended for process designers and operators working with multi-step manufacturing workflows where the order and method of ingredient addition are important for product quality and execution.
✅ Prerequisites
Before you begin, make sure you have:
Access to the Albert Worksheet and Inventory modules
A product already designed in the Worksheet
A clear understanding of your manufacturing process and the order in which ingredients are added
🧪 Step 1: Start with a Product Designed in the Worksheet
Before working with process steps, your product must already be set up in the Worksheet.
Open the Worksheet module.
Create or open the product you want to work with.
Confirm that the formulation is already designed and contains the required ingredients and amounts.

This is the foundation for the process setup that follows
🧩 Step 2: Add Parameter Groups in the Process Design Grid
Once the product is set up, define the process structure directly in the process design grid within the Worksheet.
Open the product in the Worksheet.
Go to the process design grid.
Add the required Parameter Groups.
Enter the values and settings needed for each process step.
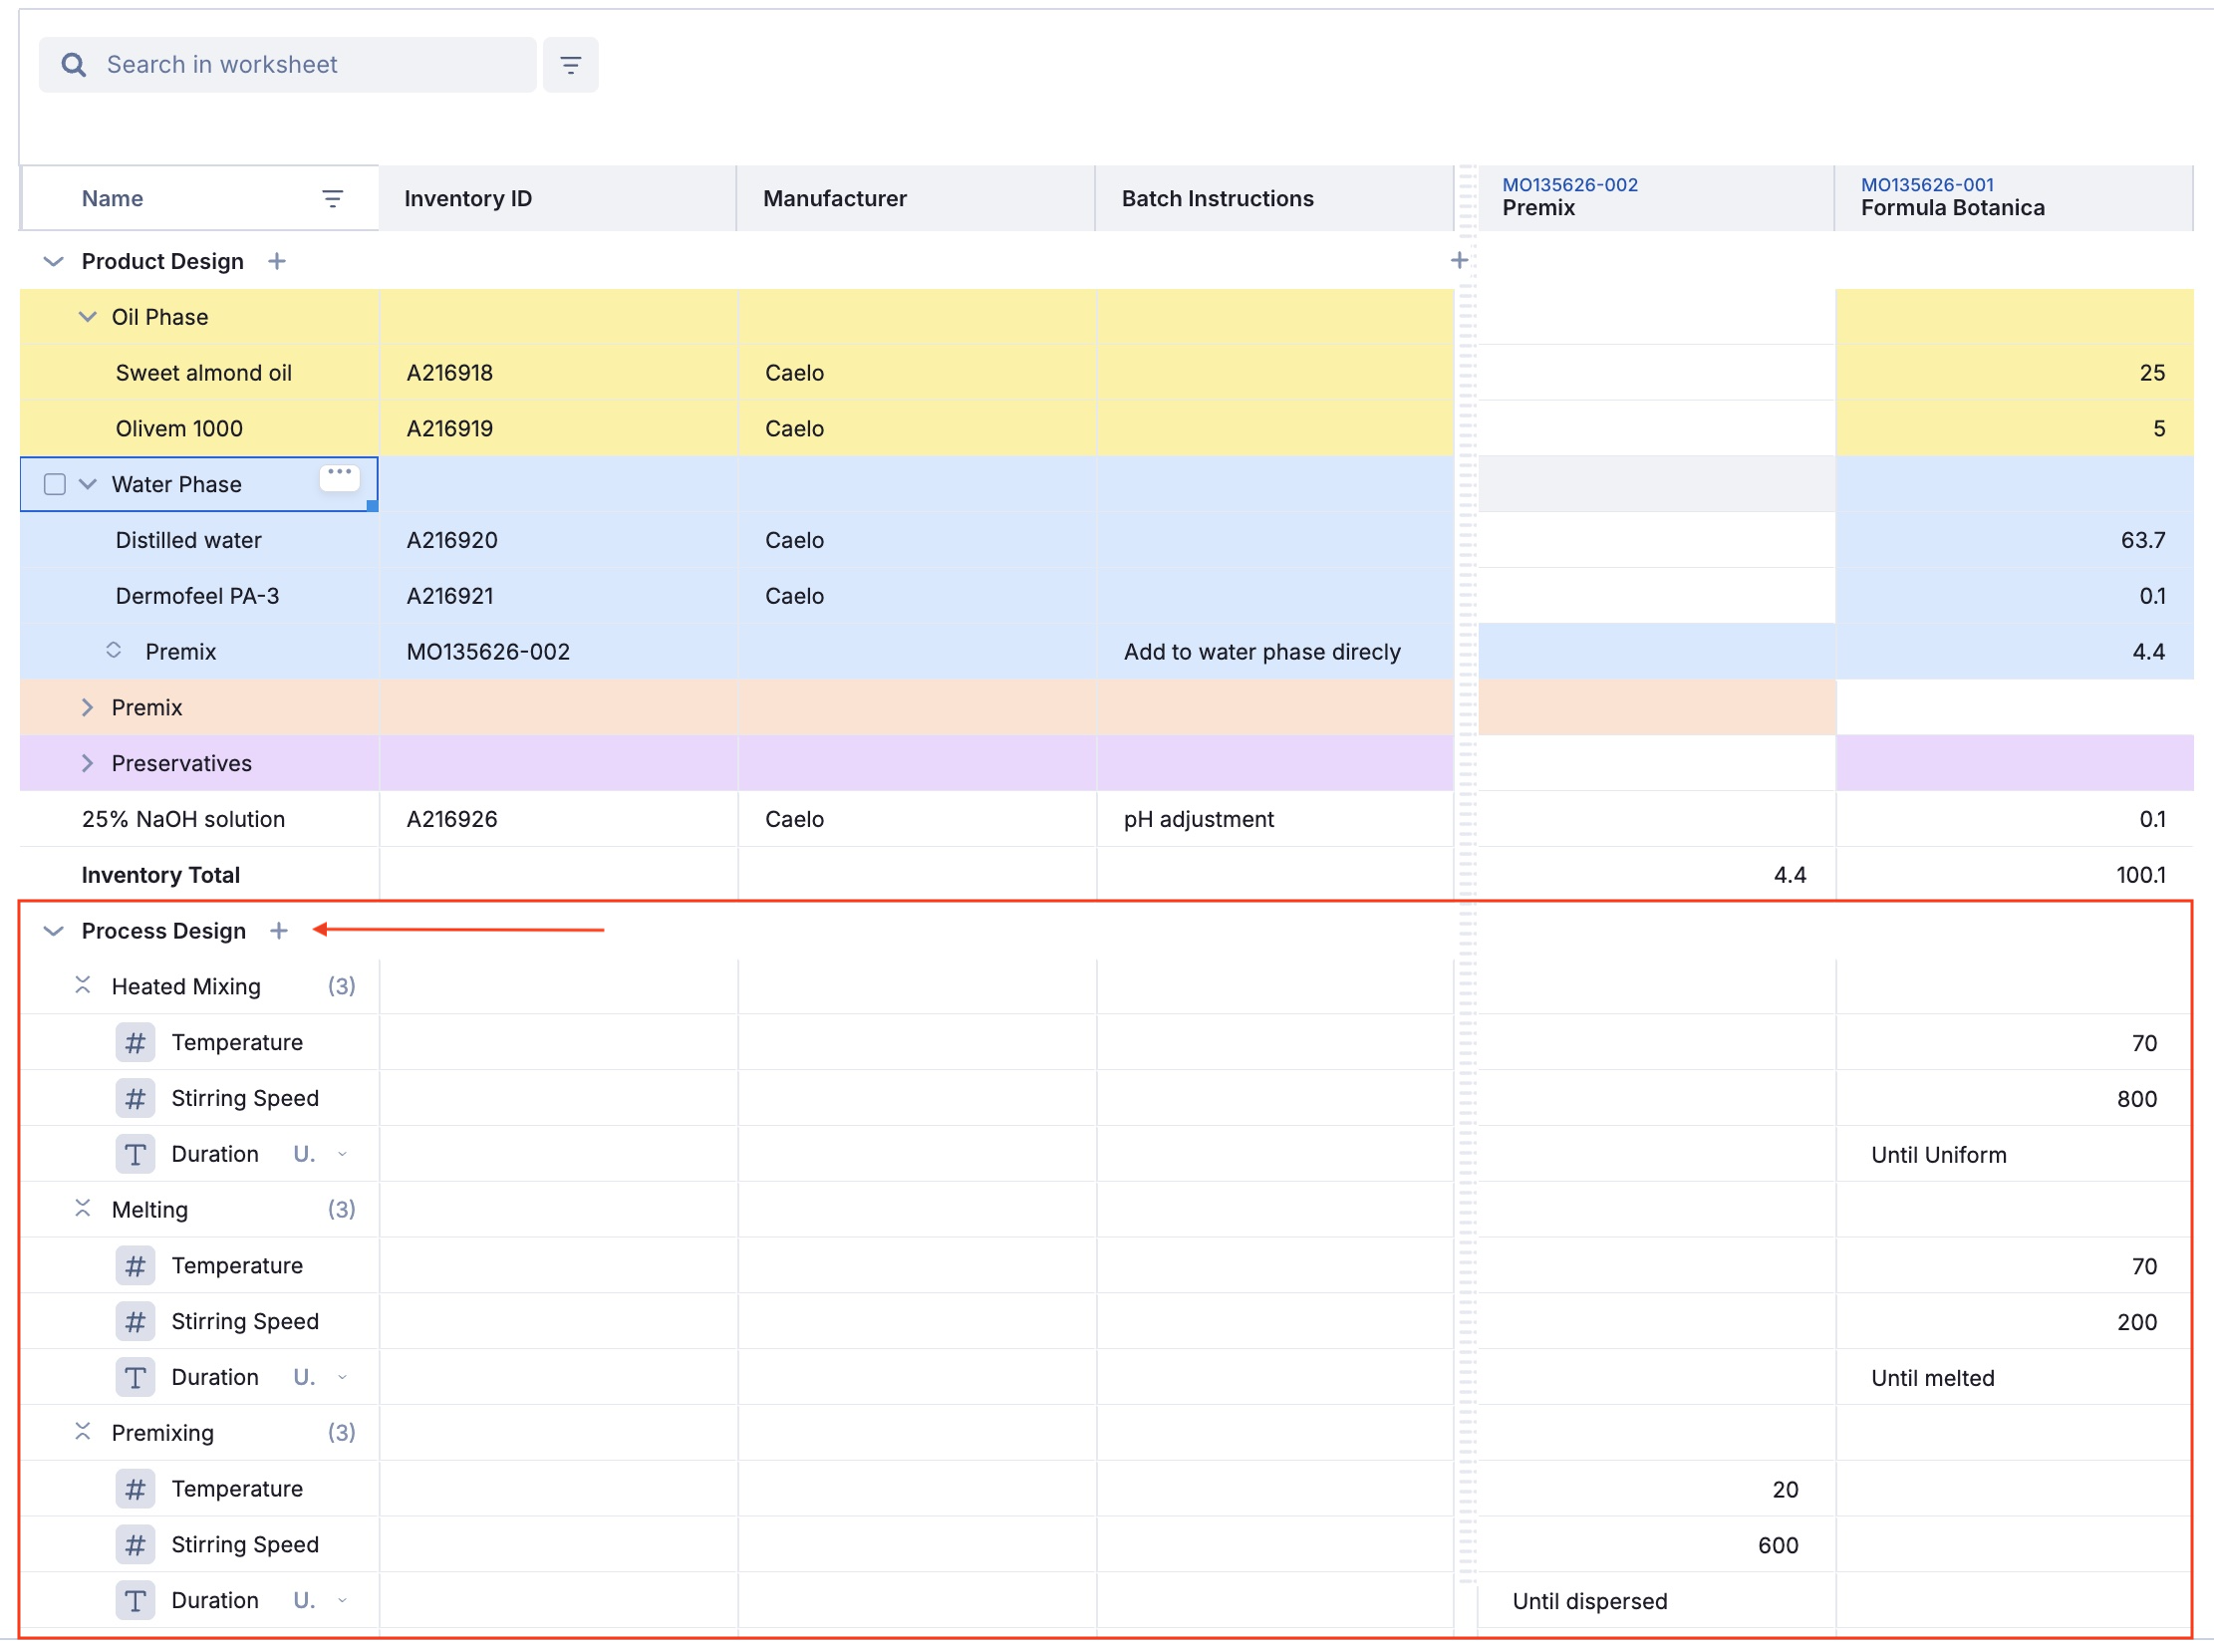
These parameter groups represent the different stages of your manufacturing process, such as melting, mixing, heating, or dropwise addition.
📦 Step 3: Adjust Parameter Groups in Inventory
After the parameter groups have been created in the Worksheet, go to Inventory.
Open the Inventory module.
Find the relevant formula.
Open the details page for that formula.
In the Instructions section, review the parameter groups that were brought in from the Worksheet.
Adjust these parameter groups so they match your actual process instructions.
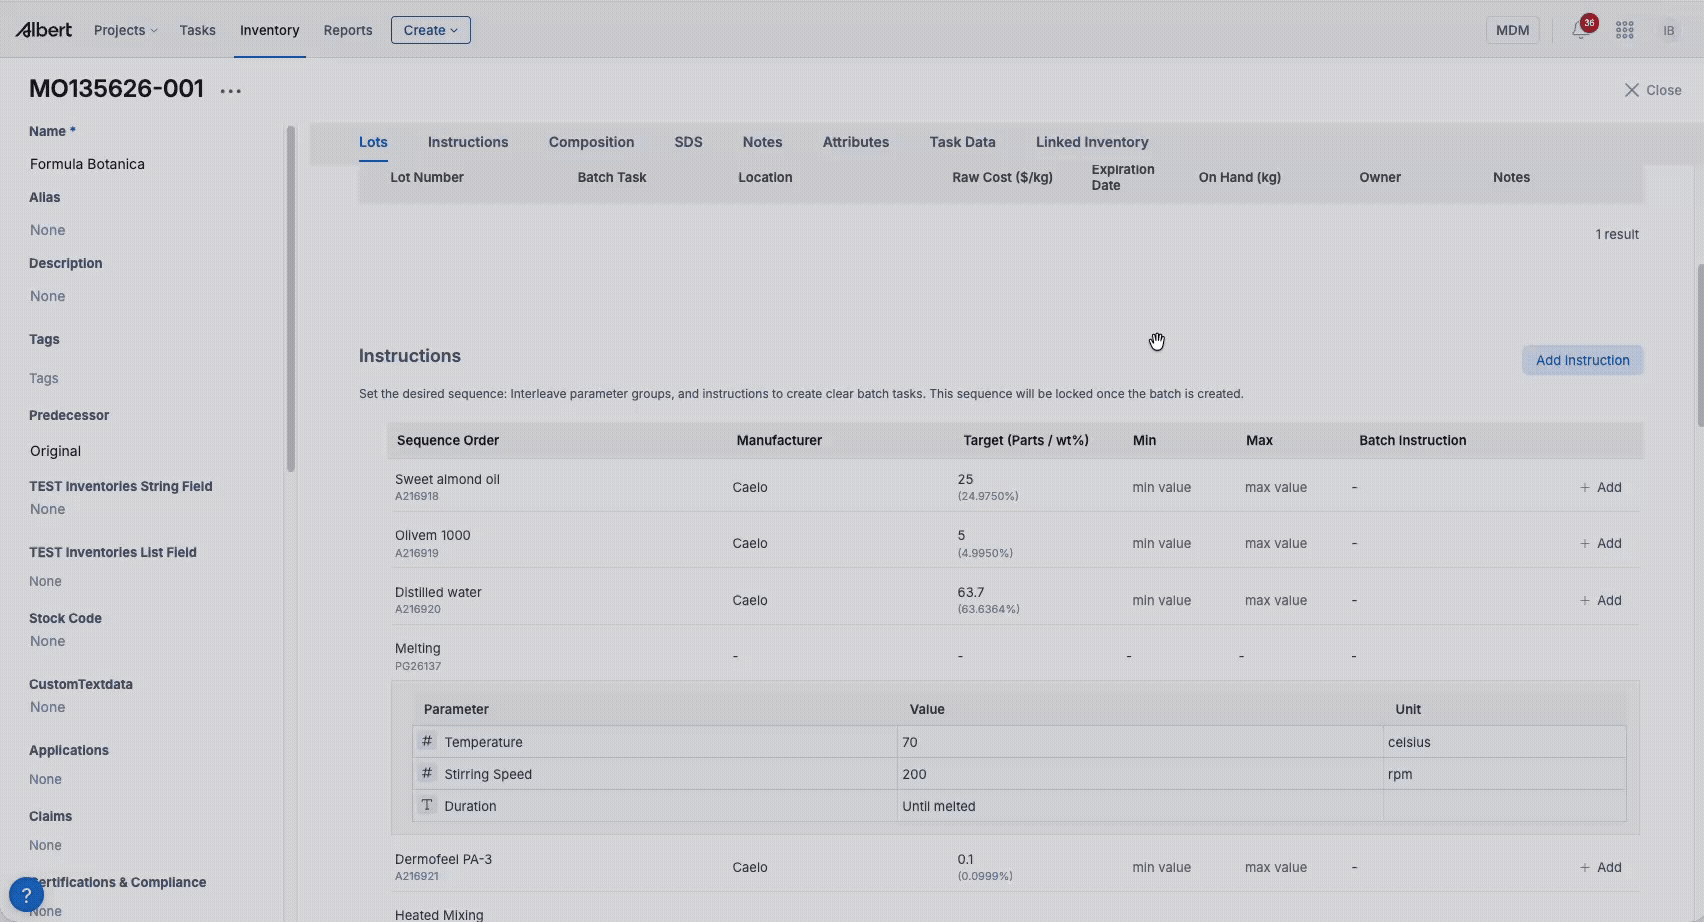
This is where you align the defined parameter groups with the practical sequence operators should follow.
🔄 Step 4: Align Ingredient Addition Order with the Process
Once the parameter groups are visible in the formula instructions, use them to structure the manufacturing sequence according to your process.
Two ingredients may be assigned to the first step for melting
A third ingredient may be added during a later mixing step
Additional ingredients may be assigned to a dropwise addition step with the appropriate timing and method
By organizing the parameter groups this way, the ingredient addition order follows the actual manufacturing process rather than appearing as a simple flat list.
📝 Step 5: Create and Execute a Batch Task
Once everything is set up in the Instructions section, go back to the Worksheet and create a Batch Task.
Return to the product in the Worksheet.
Create a new Batch Task.
Open the Batch Task.

Within the Batch Task, you will see the ingredients displayed in a well-organized process sequence. This allows operators to clearly follow the intended manufacturing flow and view the related parameter groups together with their defined values.
🔍 What this helps with
See which ingredients belong to each process step
Follow the correct addition order
Review the parameter groups and their values during execution
ℹ️ Additional Note
If you do not see the required parameter groups, you may need to create a new one first or contact the person responsible for maintaining them.
⭐ Best Practices
A few simple habits can make your process sequence easier to maintain, easier to understand, and more reliable for operators during execution.
🧪 Start with a complete formulationMake sure the product is fully designed in the Worksheet before you begin defining process steps or assigning ingredient order. | 🏷️ Use clear step namesName parameter groups in a way that makes the intended action obvious, such as Melt, Mix, or Dropwise Addition. |
📋 Review instructions before executionCheck the Instructions section in Inventory after setup to confirm that the parameter groups reflect the real manufacturing sequence. | 📝 Add context where neededUse notes to capture important execution details that are not obvious from the parameter values alone. |
🛠️ Troubleshooting
If the process sequence does not look right, review the setup step by step to identify where the mapping or instruction flow needs to be corrected.
📦 The parameter groups do not appear in Inventory
Check whether the parameter groups were created in the process design grid of the Worksheet. If they still do not appear, create a new parameter group or contact the person responsible for maintaining them.
🔄 The process sequence does not match the manufacturing process
Review the parameter groups in the Inventory details page and adjust them in the Instructions section so they reflect the correct process order.
👀 Operators are unclear about when to add ingredients
Make sure the parameter groups are named clearly and correspond to the actual manufacturing sequence shown in the Batch Task.