
Bulk Inventory Lot Actions and Reconciliation
Bulk Inventory Lot Actions and Reconciliation
Albert's Bulk Inventory Lot Actions and Reconciliation feature helps you perform large-scale inventory updates efficiently and accurately. Whether you're reconciling stock after a physical count, zeroing out depleted lots, or transferring items between locations, bulk capabilities save time, reduce manual errors, and keep inventory records aligned across all locations.
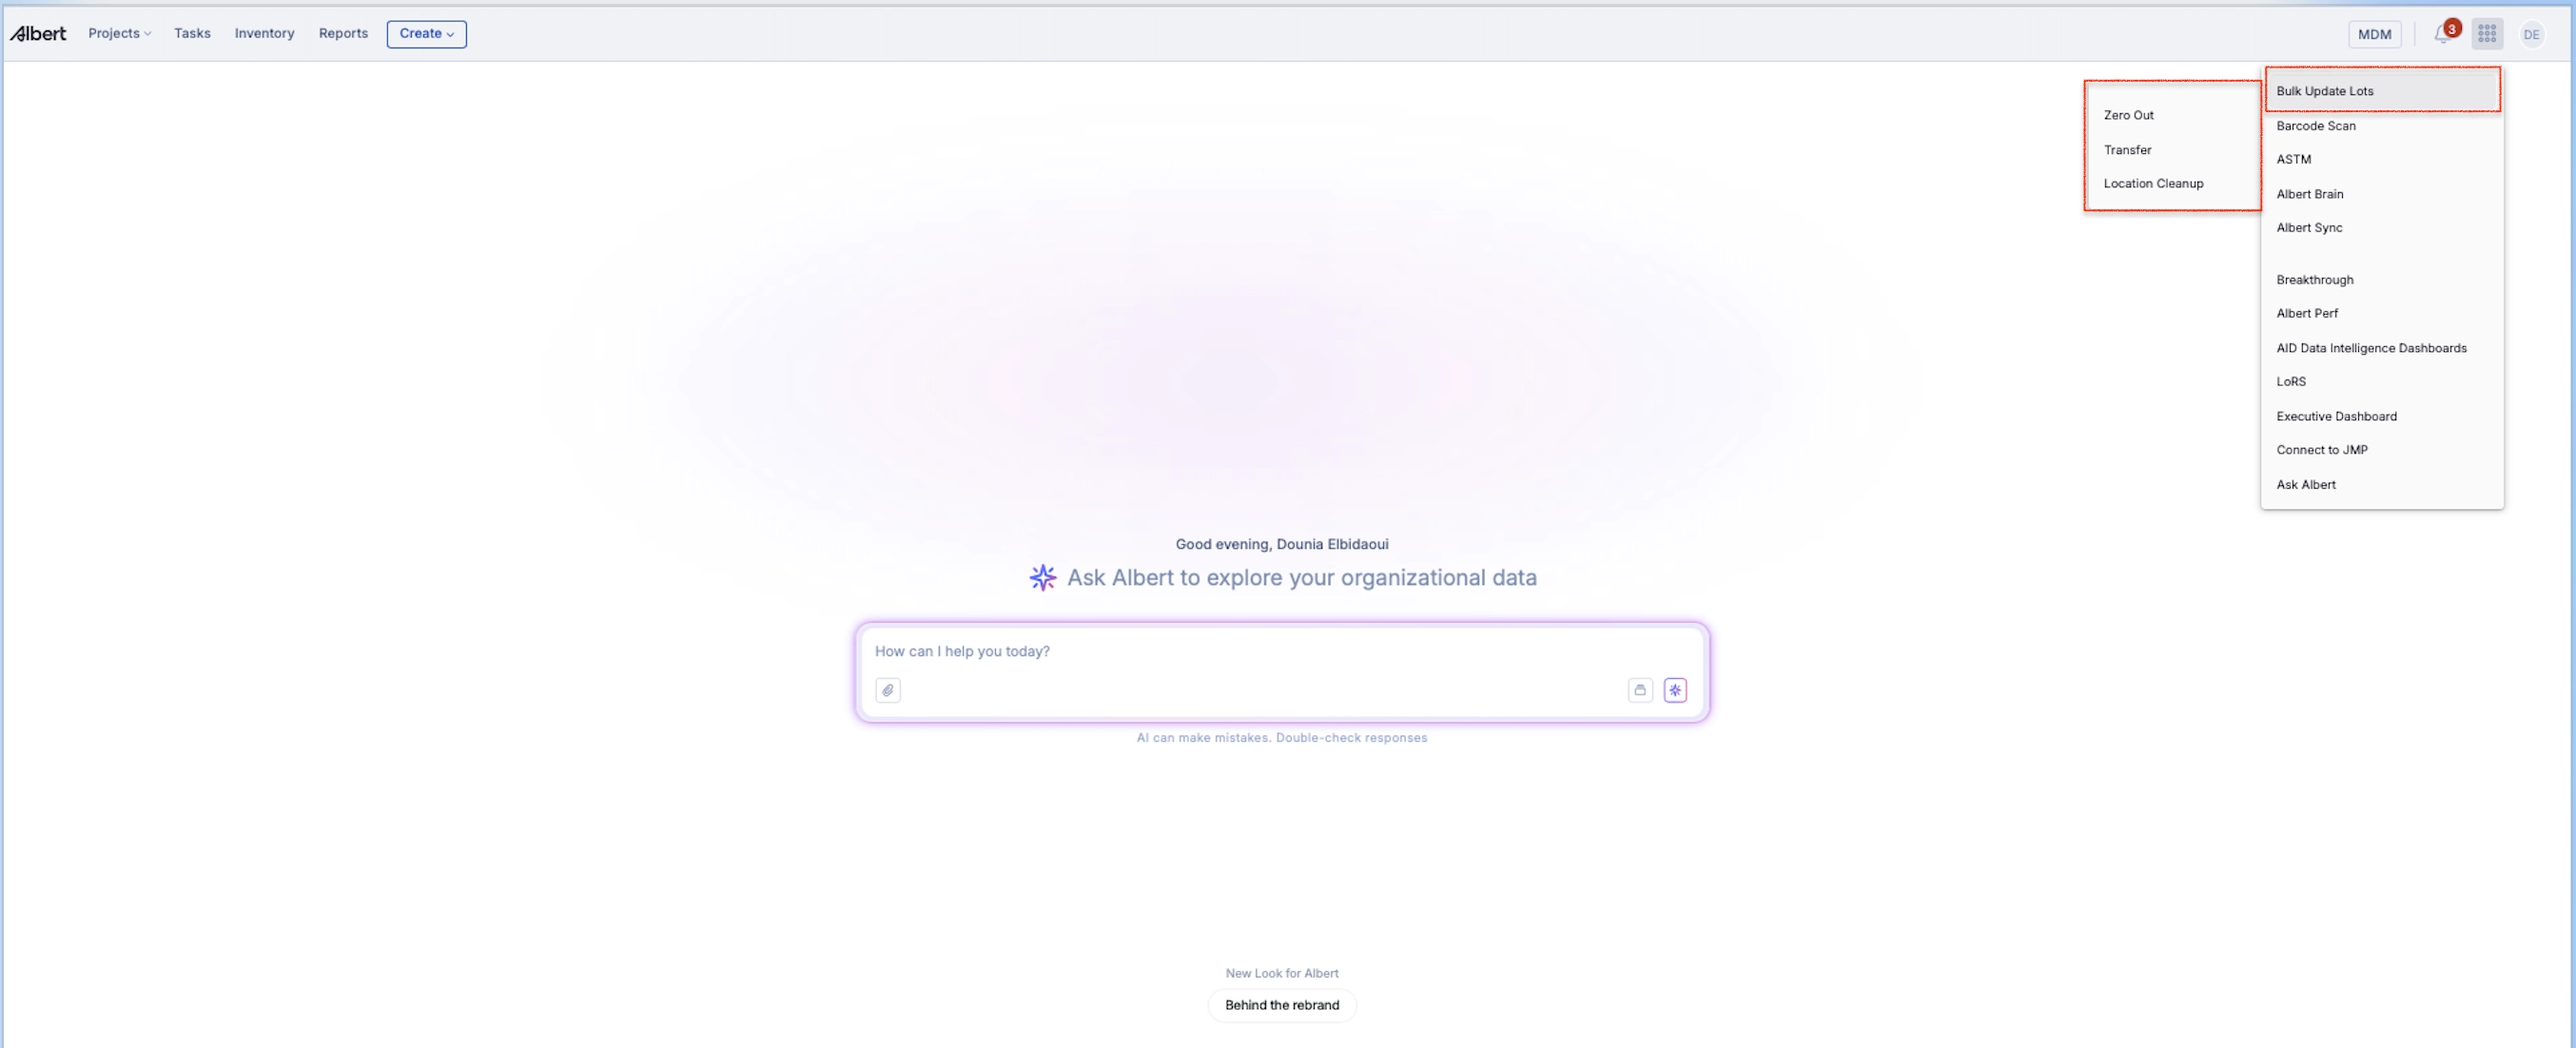
To access this feature, click the 9-dot app launcher (top right corner of any page) and select Bulk Update Lots.
You will see three available tabs:
Zero Out: Mark multiple lots as depleted.
Transfer: Move multiple lots between storage locations.
Location Cleanup: Review and reconcile inventory at specific storage sites.
Performing a Bulk Zero Out
The Zero Out option is used to mark multiple lots as depleted or discarded, ideal for managing expired materials or completed batches.
To perform a zero-out:
Select the Zero Out tab under Bulk Update Lots.
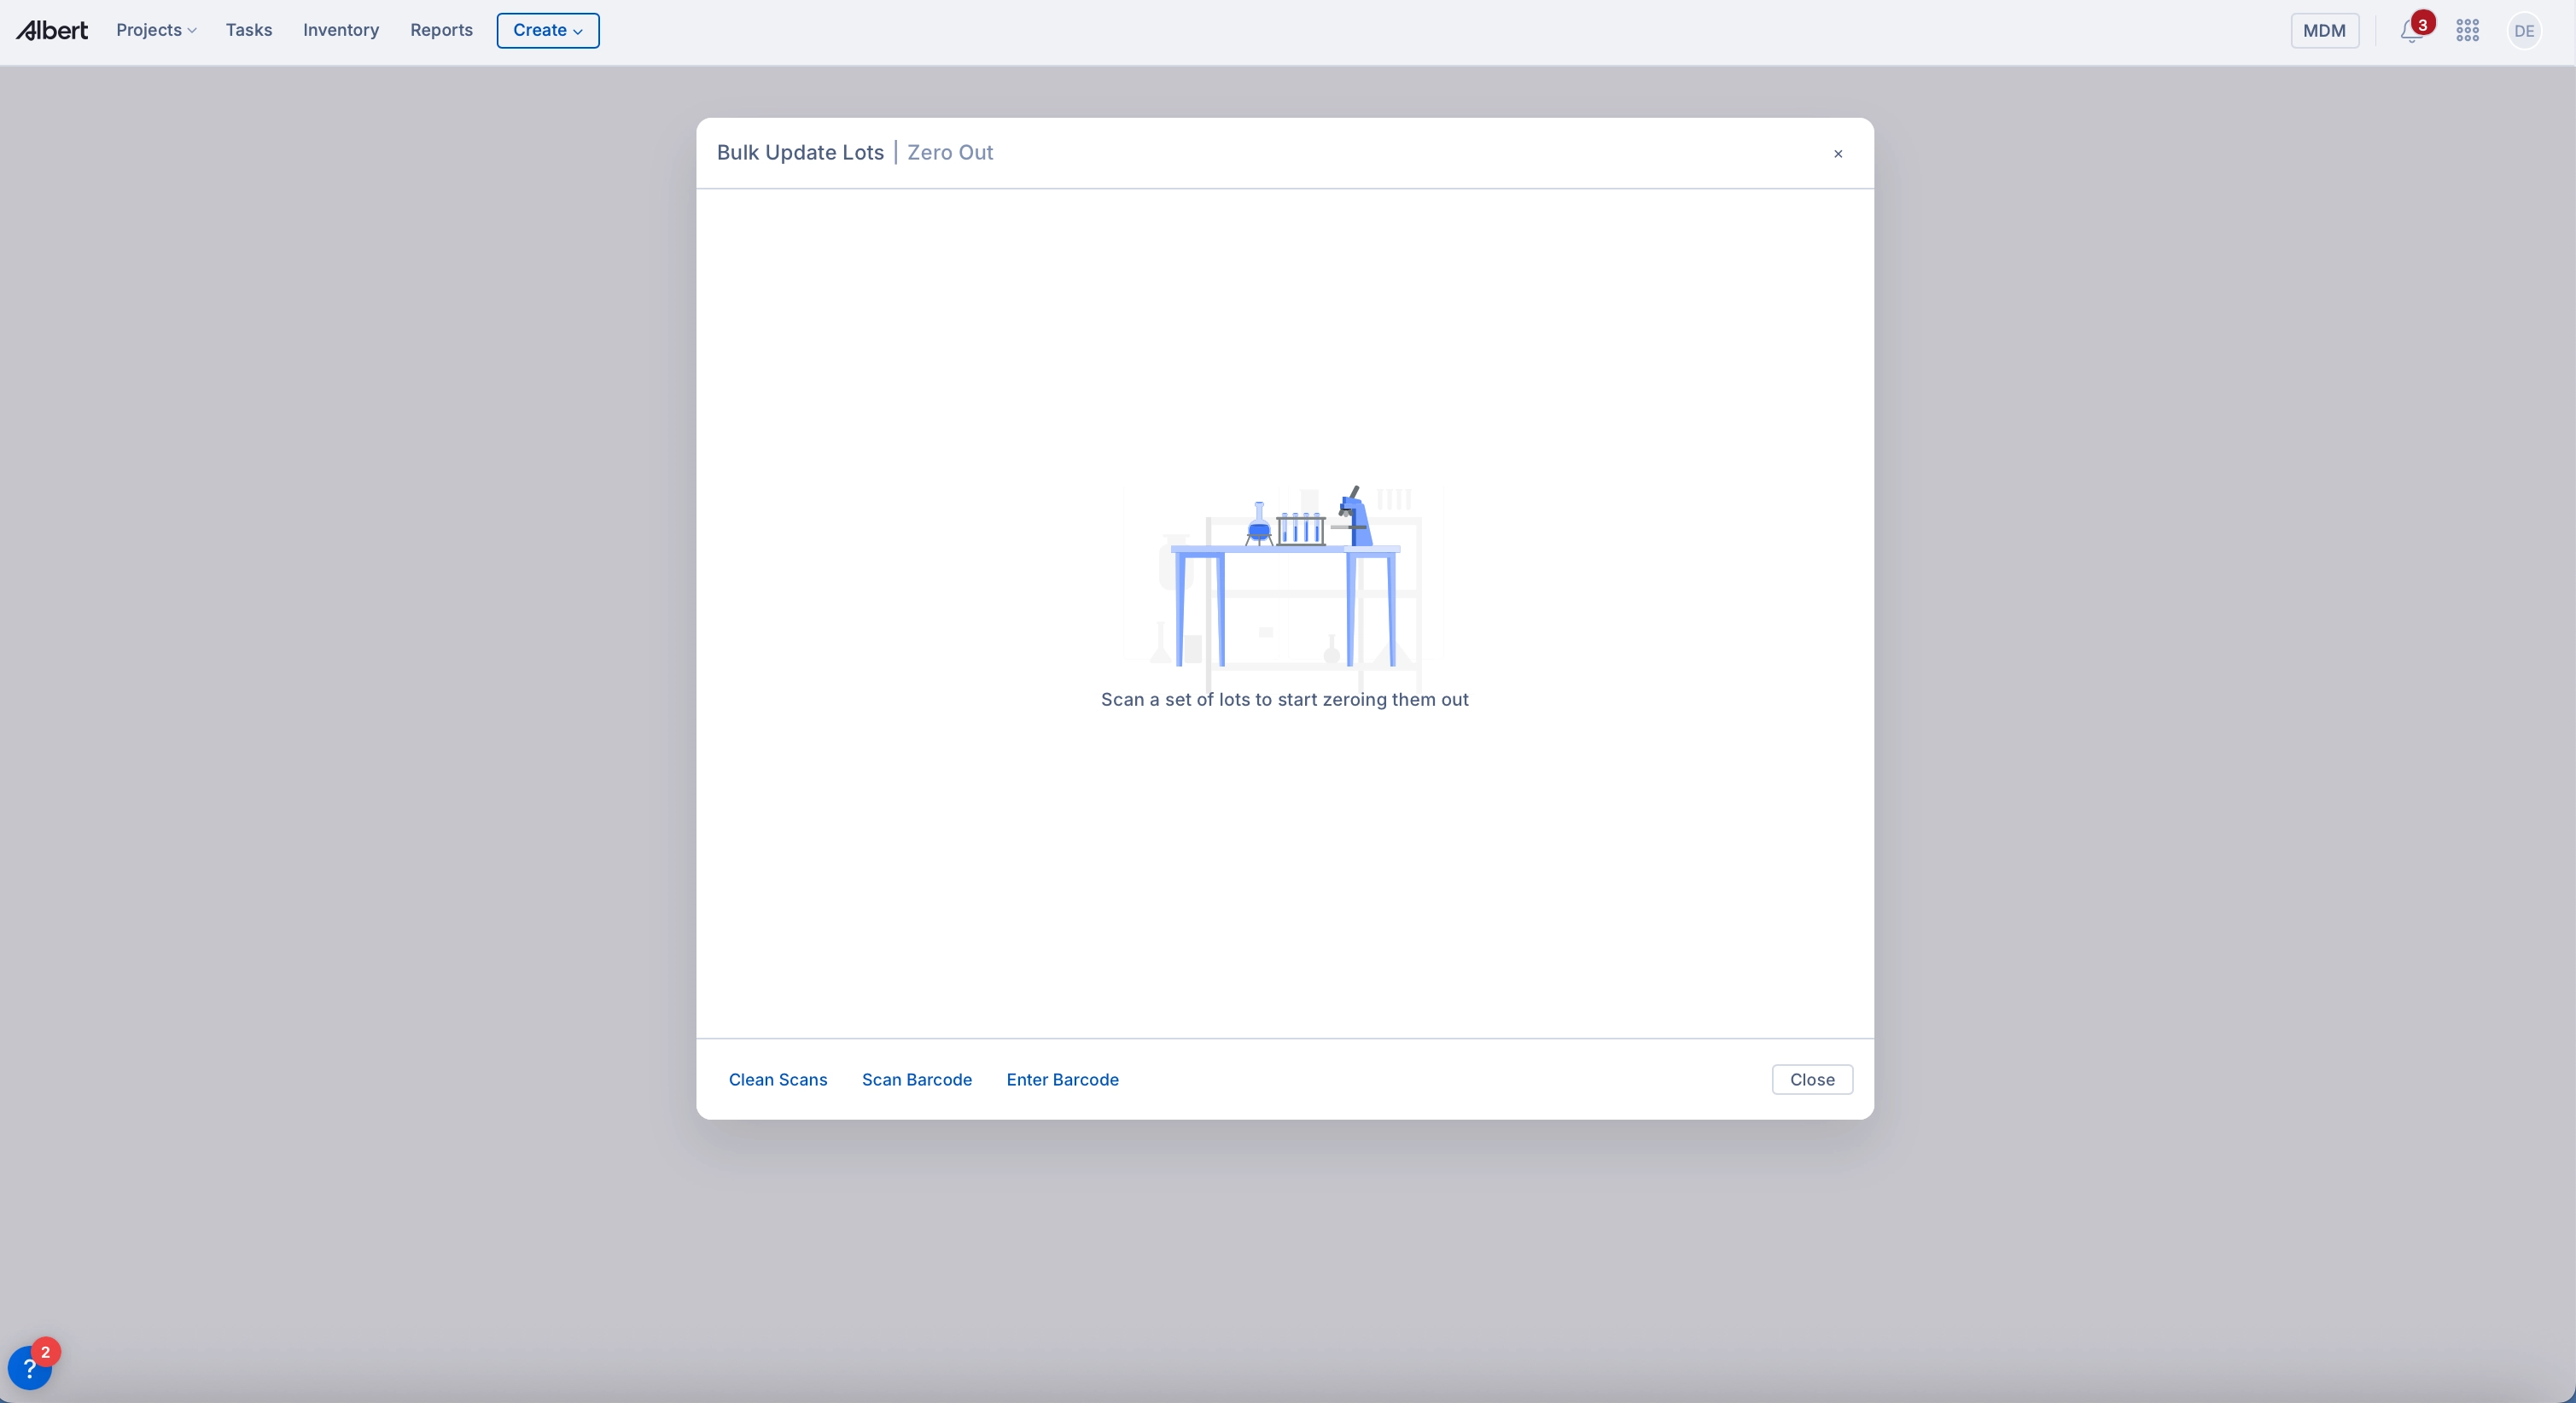
Scan or enter the lot numbers you wish to zero out.
The header message will prompt: "Scan a set of lots to start zeroing out."
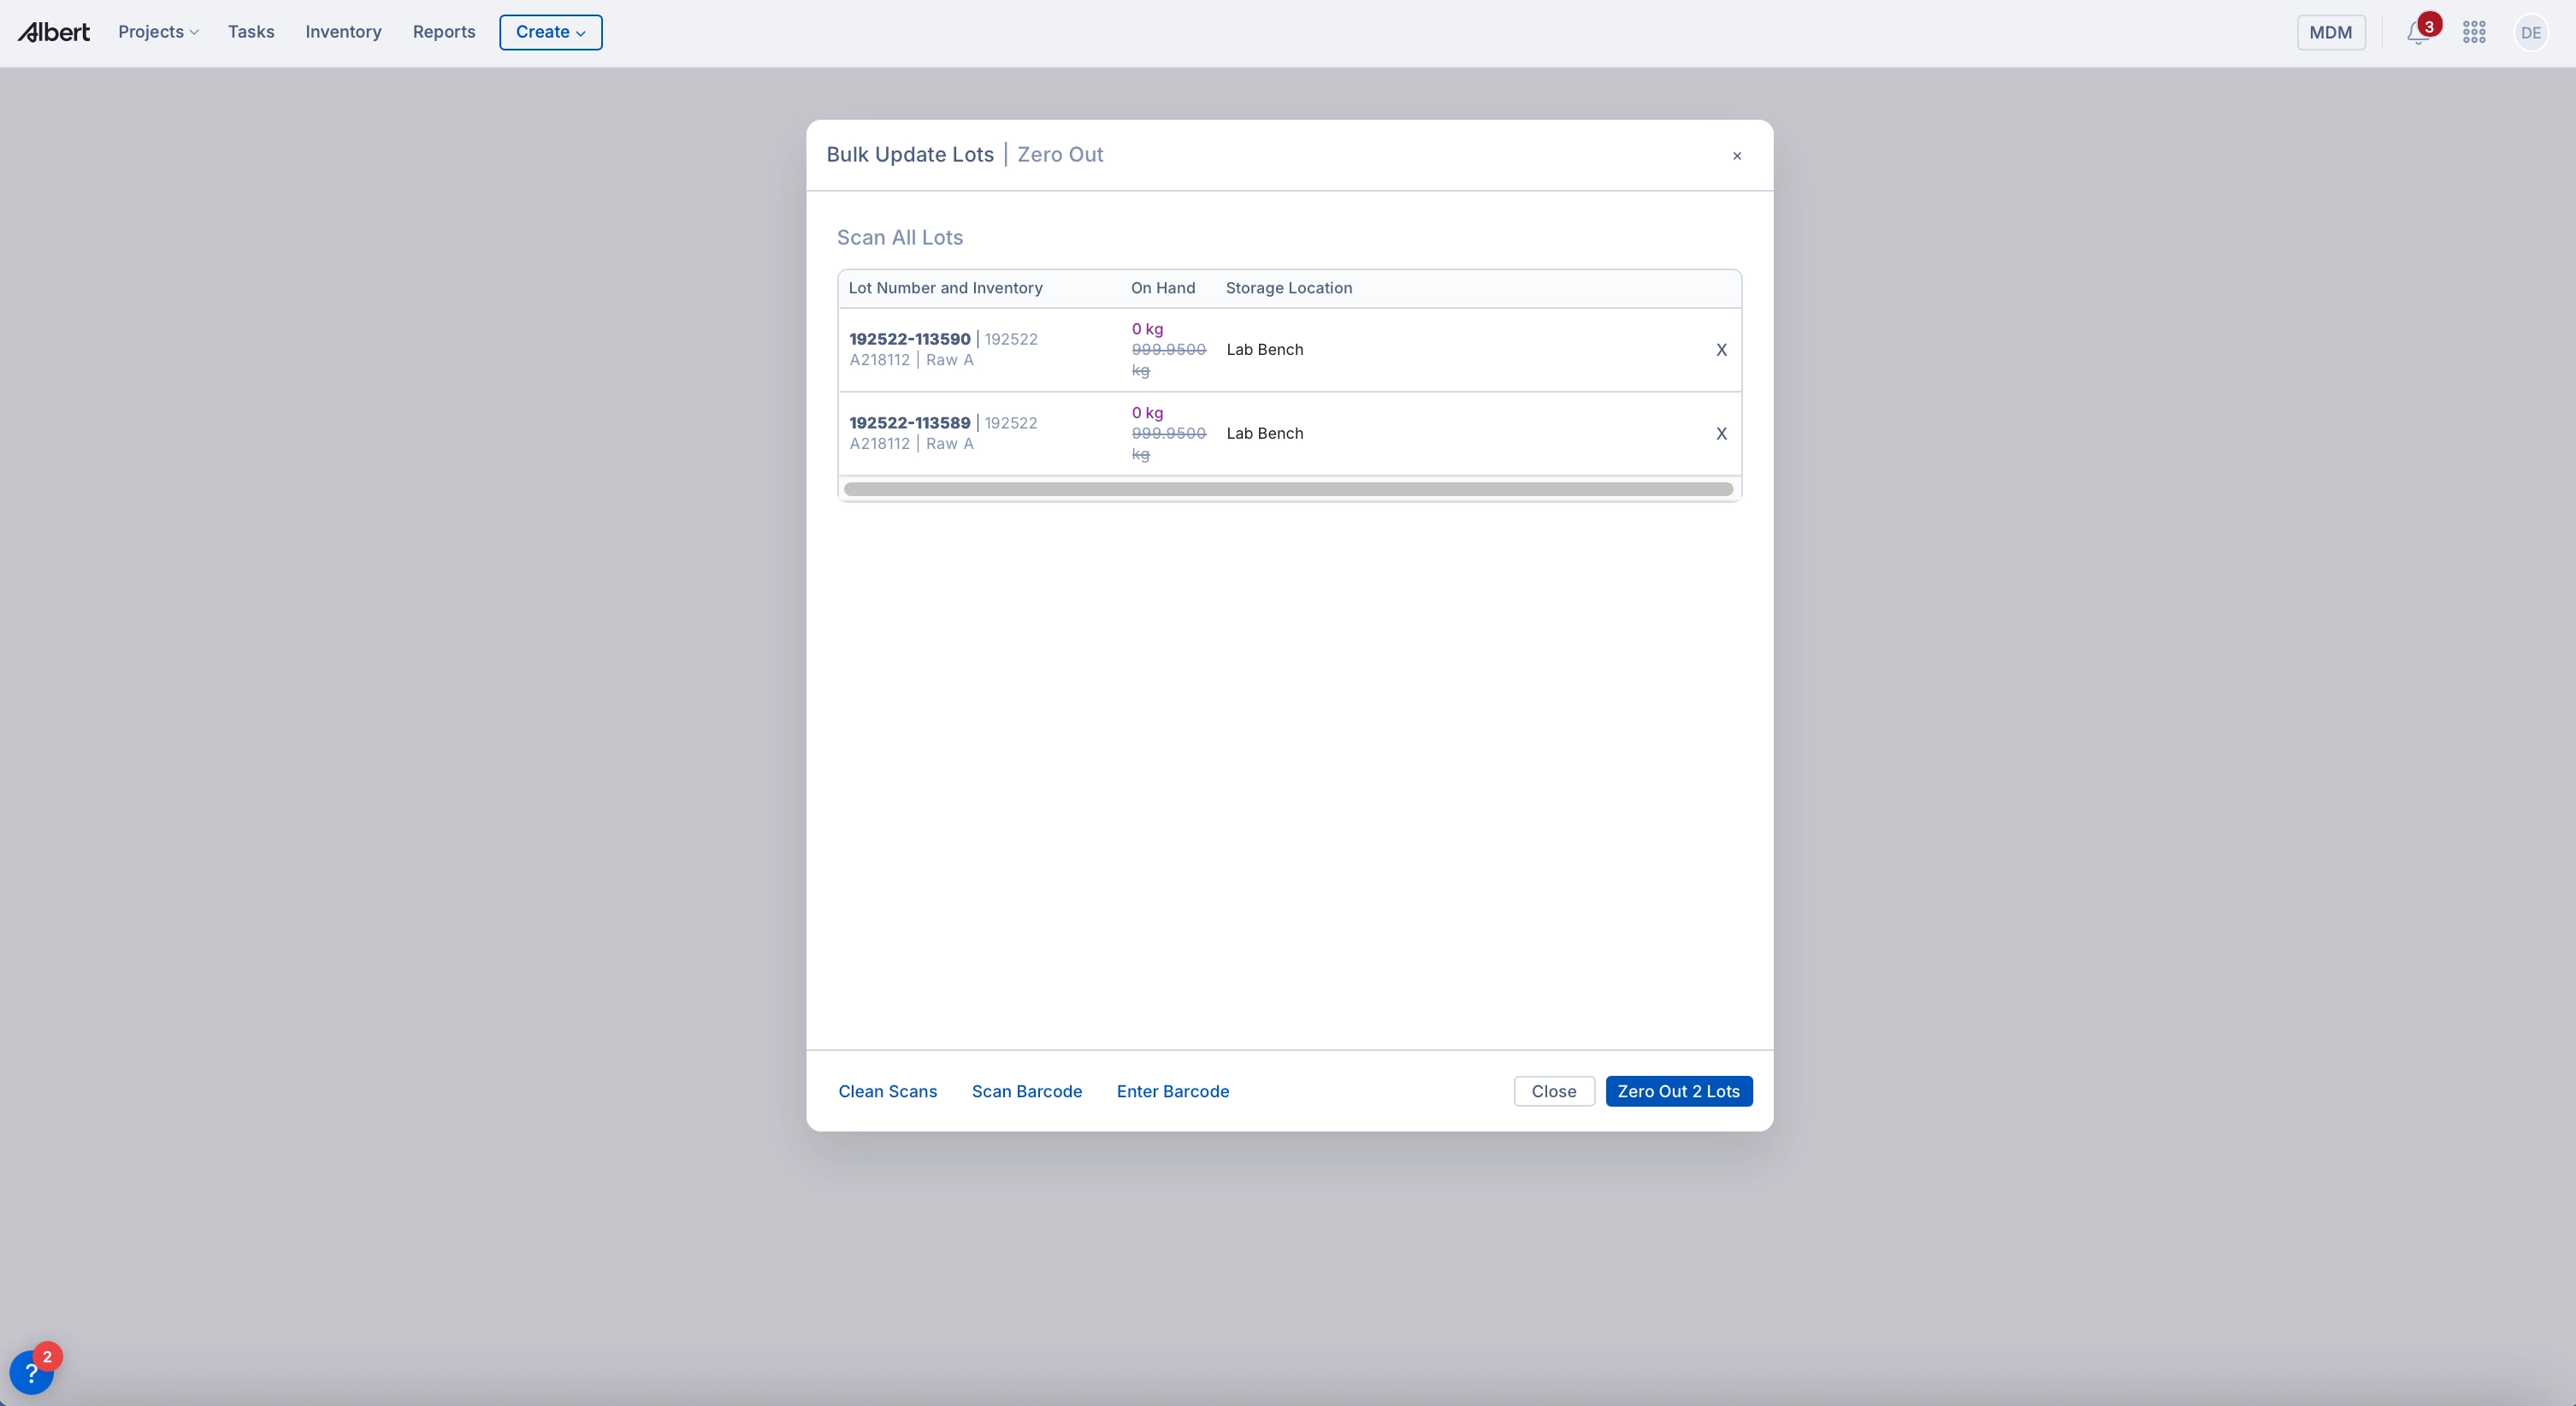
Once scanned, the system will list each lot with its On Hand Quantity and Current Location.
Click Zero Out Lots to confirm and finalize the depletion.
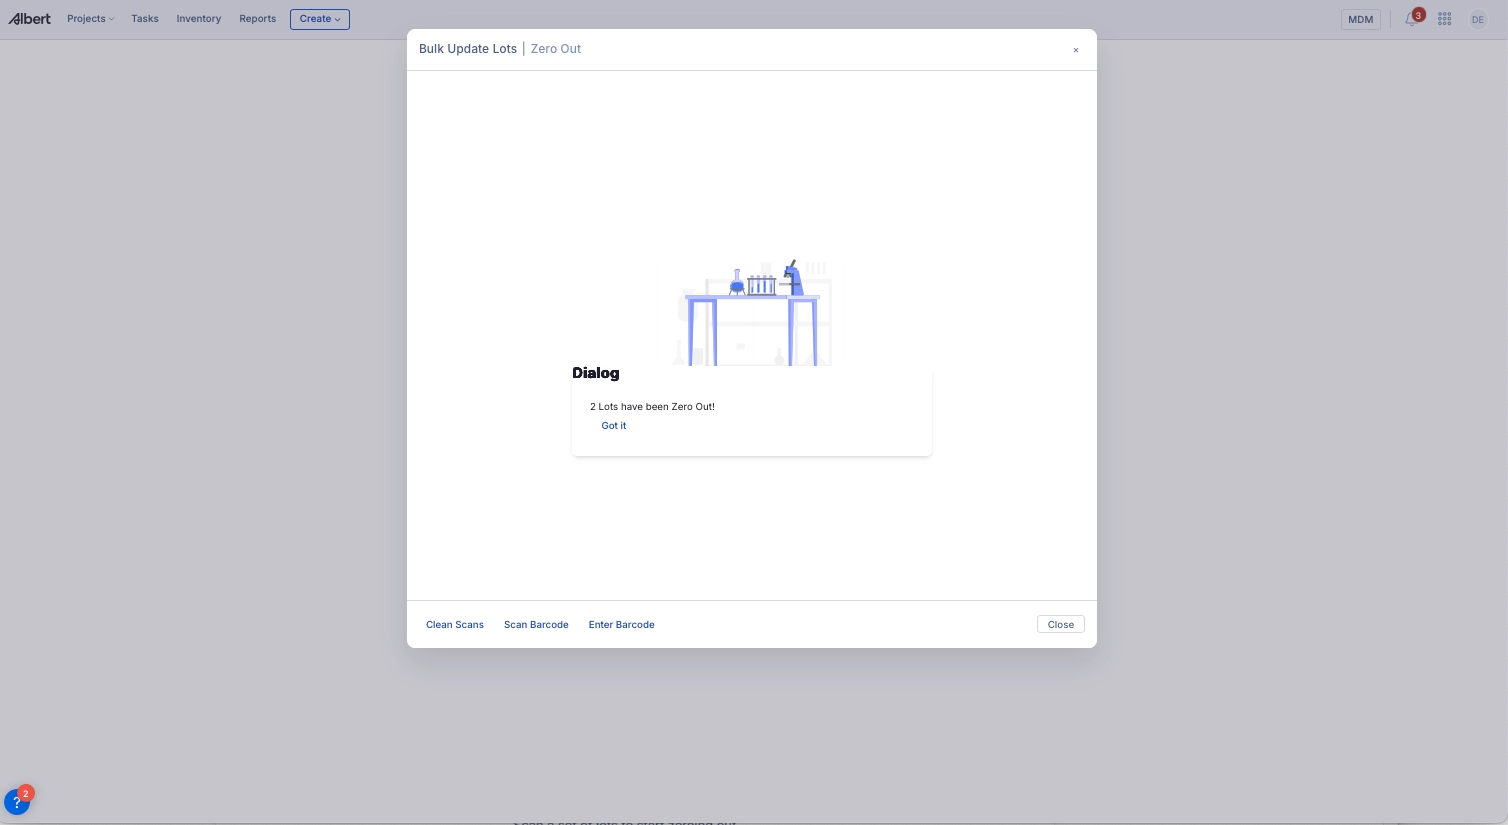
After completion, a success message will appear confirming the zero-out operation.
Performing a Bulk Transfer
The Bulk Transfer action allows you to move several inventory lots at once from one location to another.
To perform a transfer:
Select the Transfer tab in the Bulk Update Lots window.
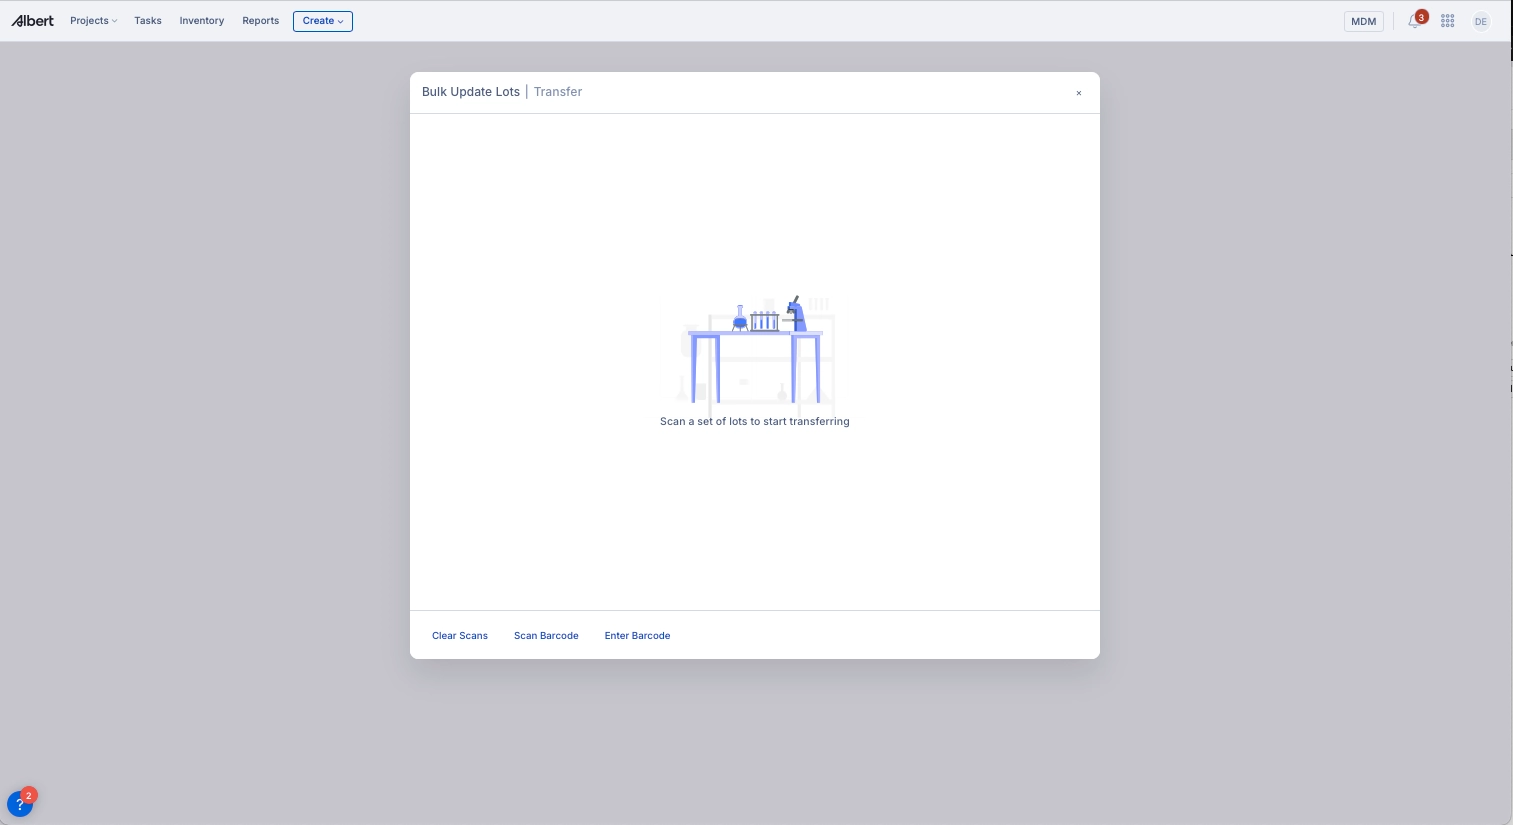
Use the Scan Barcode option to begin scanning lots using your laptop camera.
If you're using a handheld barcode scanner, you can start scanning directly; there's no need to click the Scan Barcode button.
Alternatively, enter the barcode manually by clicking Enter Barcode and typing the lot number.
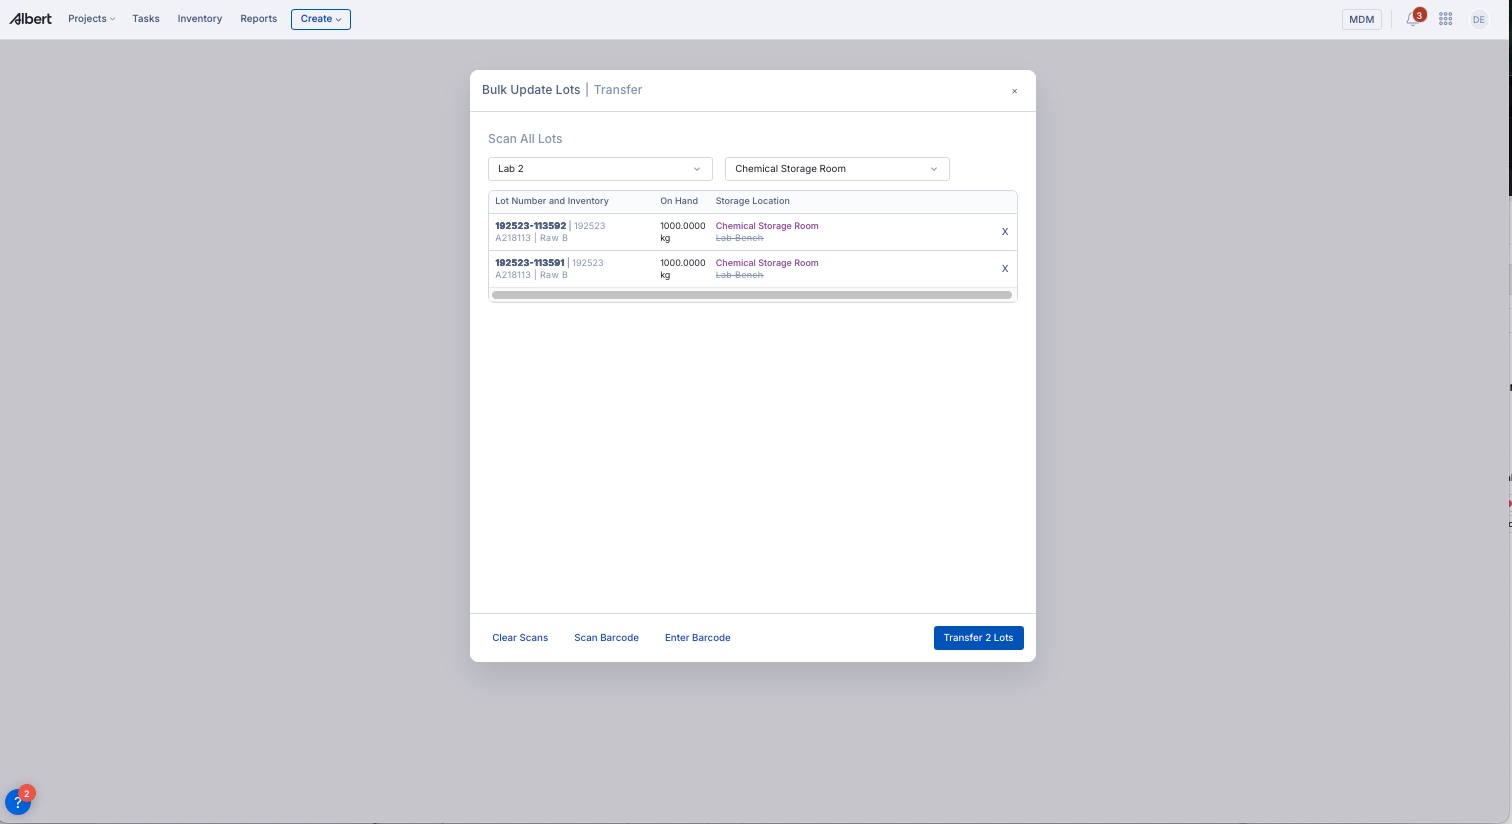
Each scanned lot will appear in a list with details like Lot Number, Inventory Item, On Hand Quantity, and Current Storage Location.
From the dropdown menus at the top, select the new:
Location
Storage Location
Once all lots are scanned and assigned a destination, click Transfer Lots.
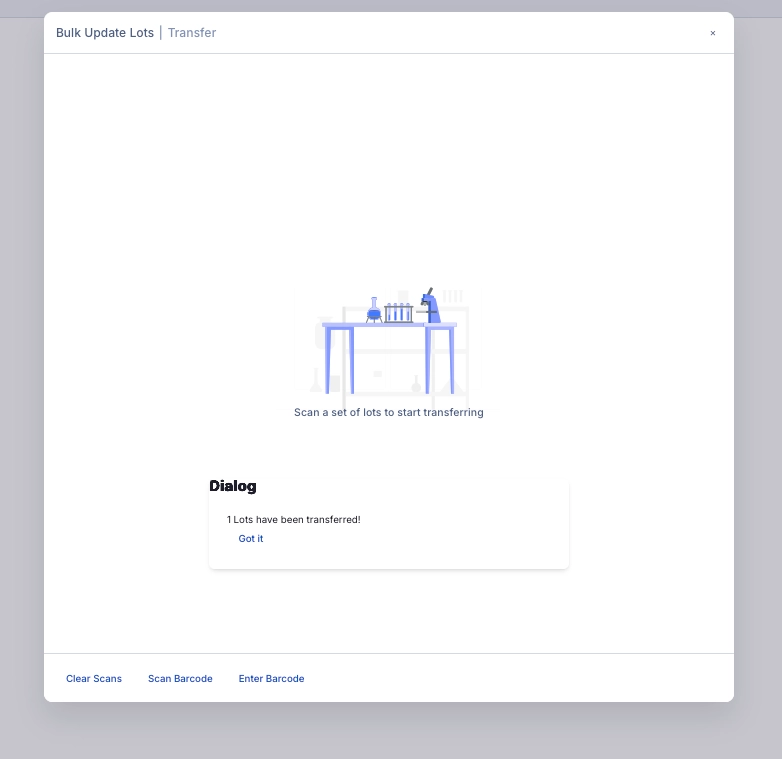
You will see a confirmation message: "Lots have been transferred!"
Storage Location Cleanup and Reconciliation
The Storage Location Cleanup lets you physically audit chemicals across multiple storage areas in one session — scanning each lot, verifying quantities and condition, and reconciling any discrepancies back into Albert. Use this during periodic audits or whenever you need to ensure your digital records match what's physically in the lab.
The workflow consists of three steps: Setup, Scan, and Review.
Step 1: Setup
Select the Location Cleanup tab under Bulk Update Lots.
From the location dropdown, select the facility location you're auditing (e.g., D123 Duesseldorf, Germany).
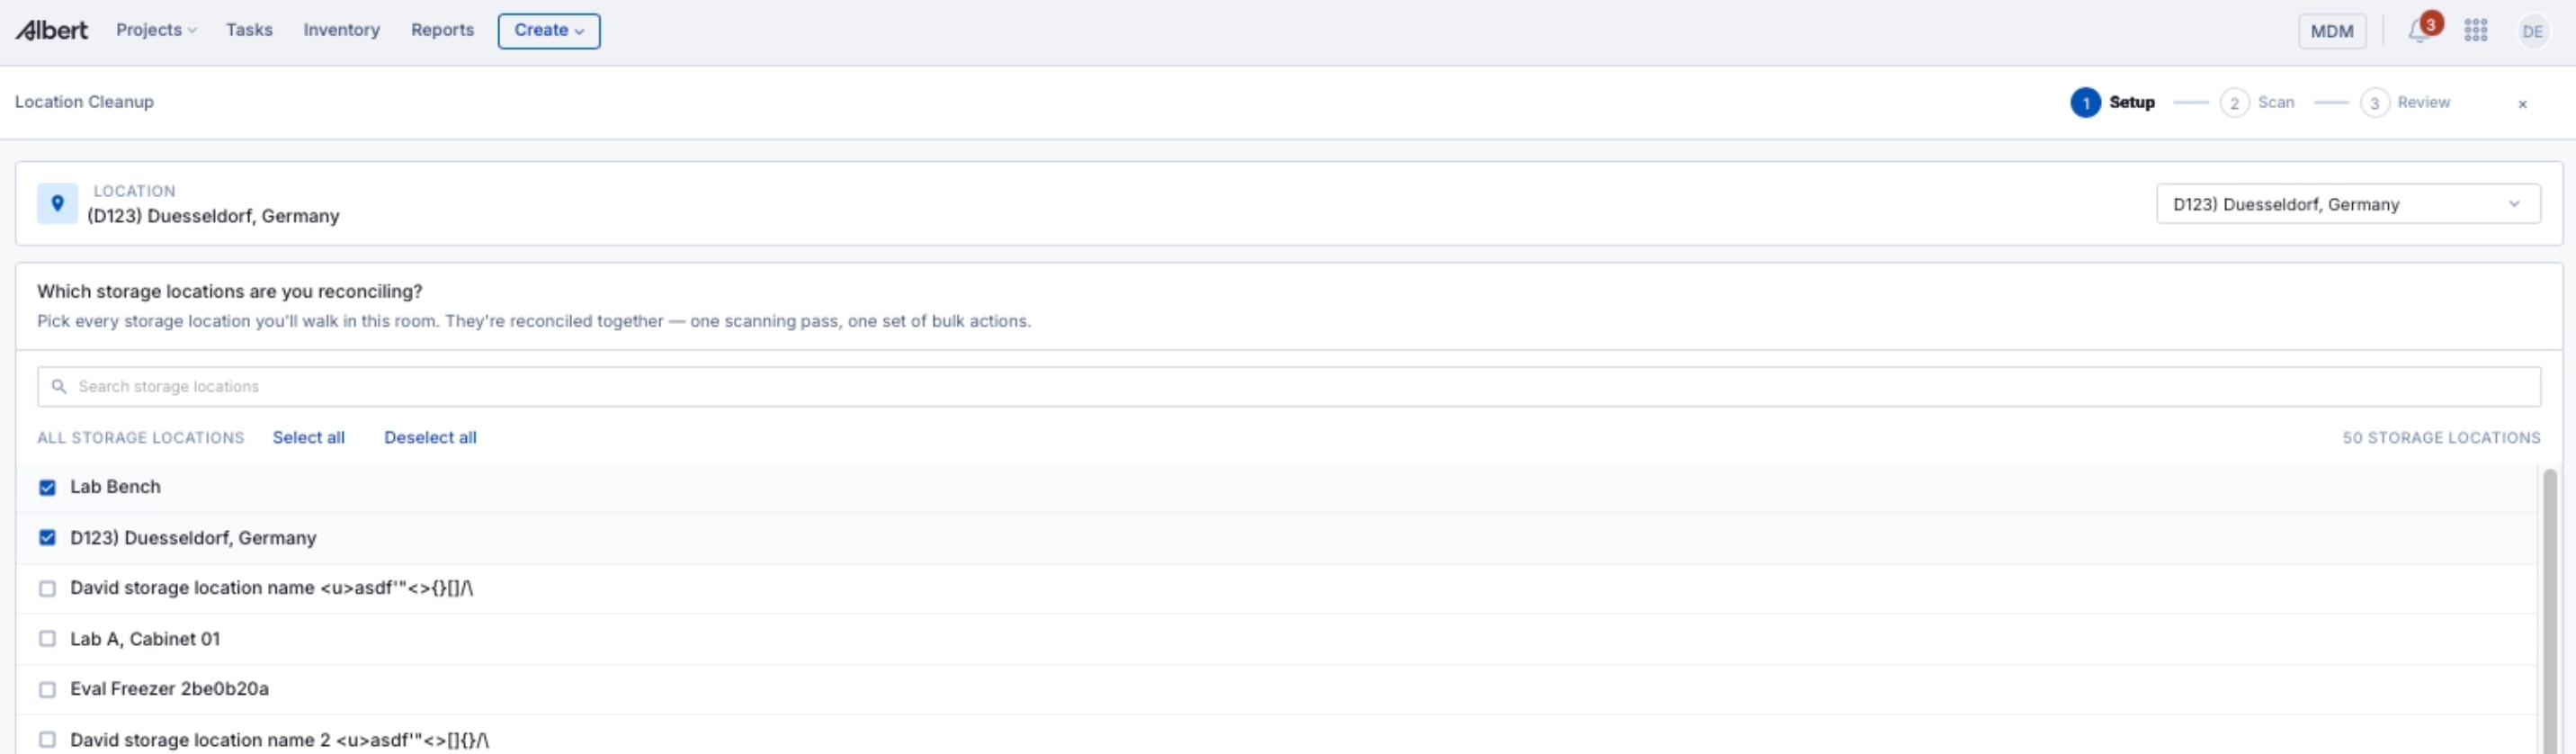
A list of all storage locations within that facility appears. Select up to 20 storage locations to include in this session. Use Select all, Deselect all, or check individual locations. All selected locations are reconciled together — one scanning pass, one set of bulk actions.
Click Next to begin scanning.
Click Start Cleanup to proceed to scanning.
Step 2: Scan
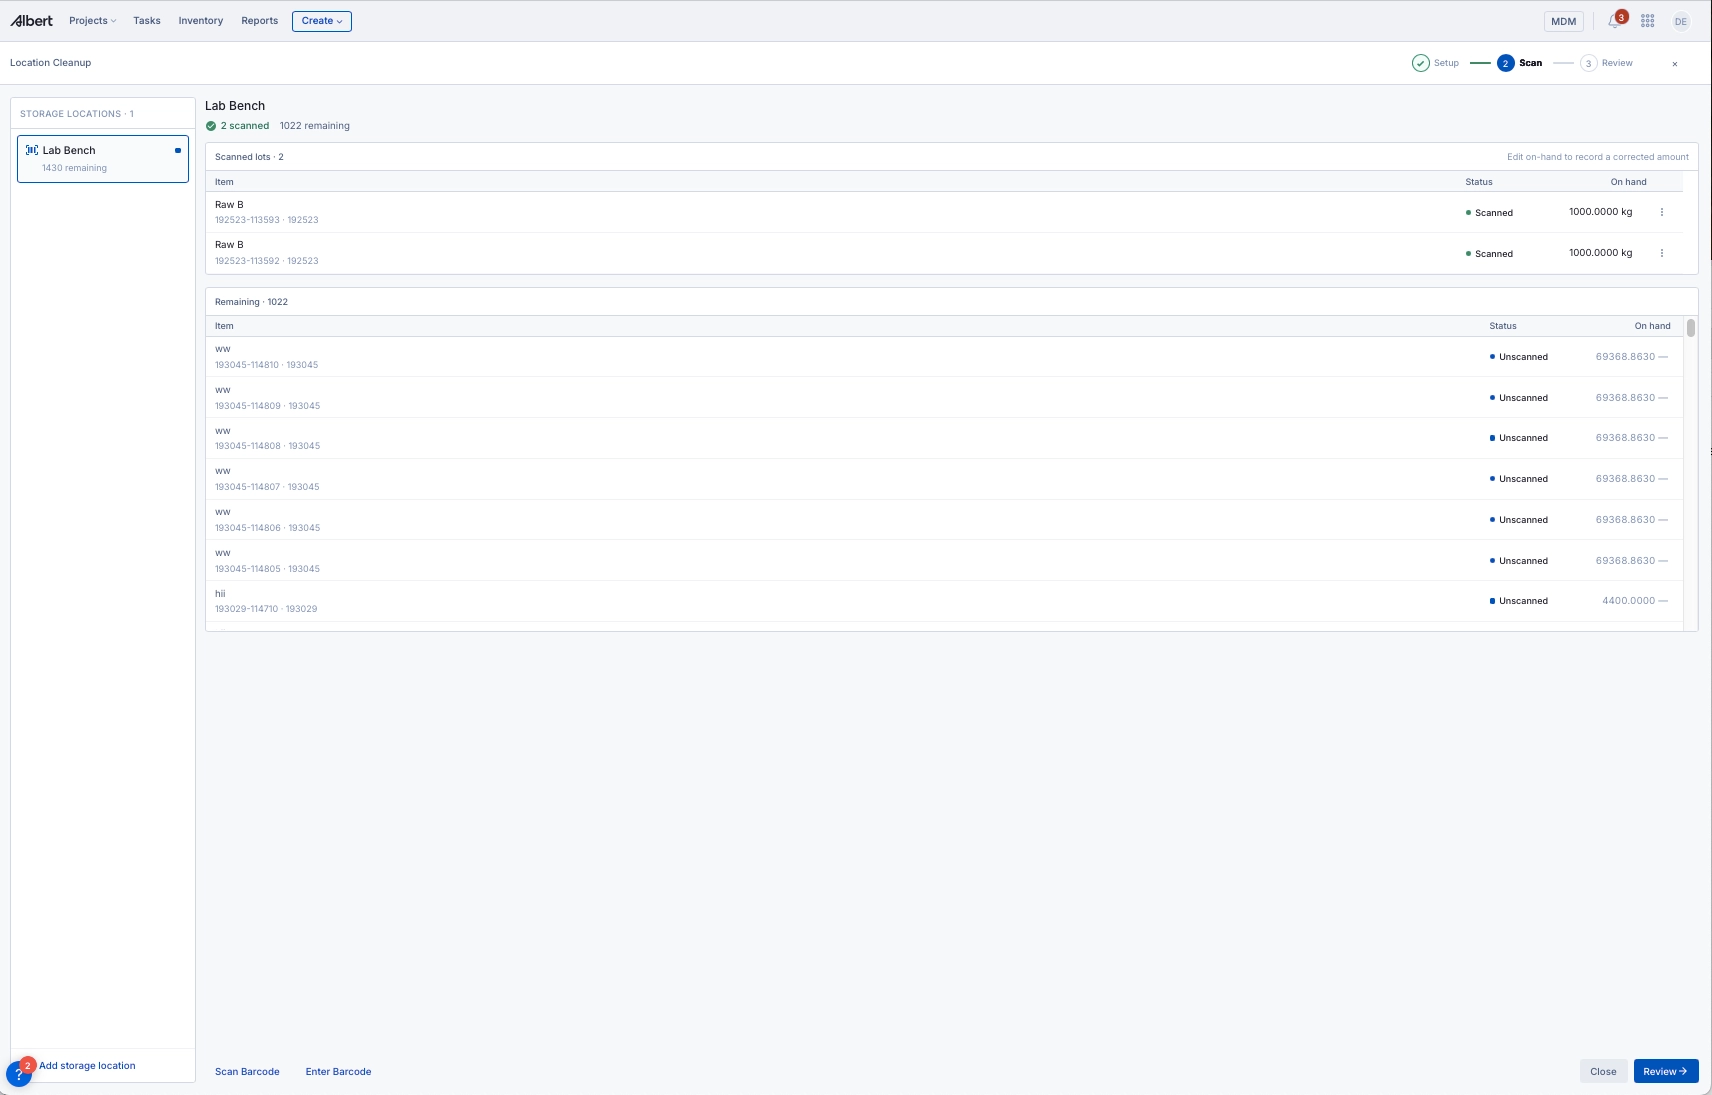
The Scan step shows:
Scanned lots: Items you've physically verified (appear at the top)
Remaining items: Lots recorded in Albert for this location that you haven't scanned yet (listed below with count of items still to scan)
To scan items:
Use a handheld barcode scanner or click Scan Barcode to use your laptop camera.
To enter a barcode manually, click Enter Barcode and type the lot number.
Begin scanning each physical lot using your barcode scanner or the Scan Barcode button (laptop camera).
Scanned lots move to the top section.
As you scan, the "remaining" count decreases.
You can also manually record an item by clicking Enter Barcode and typing the lot number.
When you scan an item that Albert expects to find in this location but is actually stored elsewhere, the system flags it as Misplaced (shown with a red indicator).
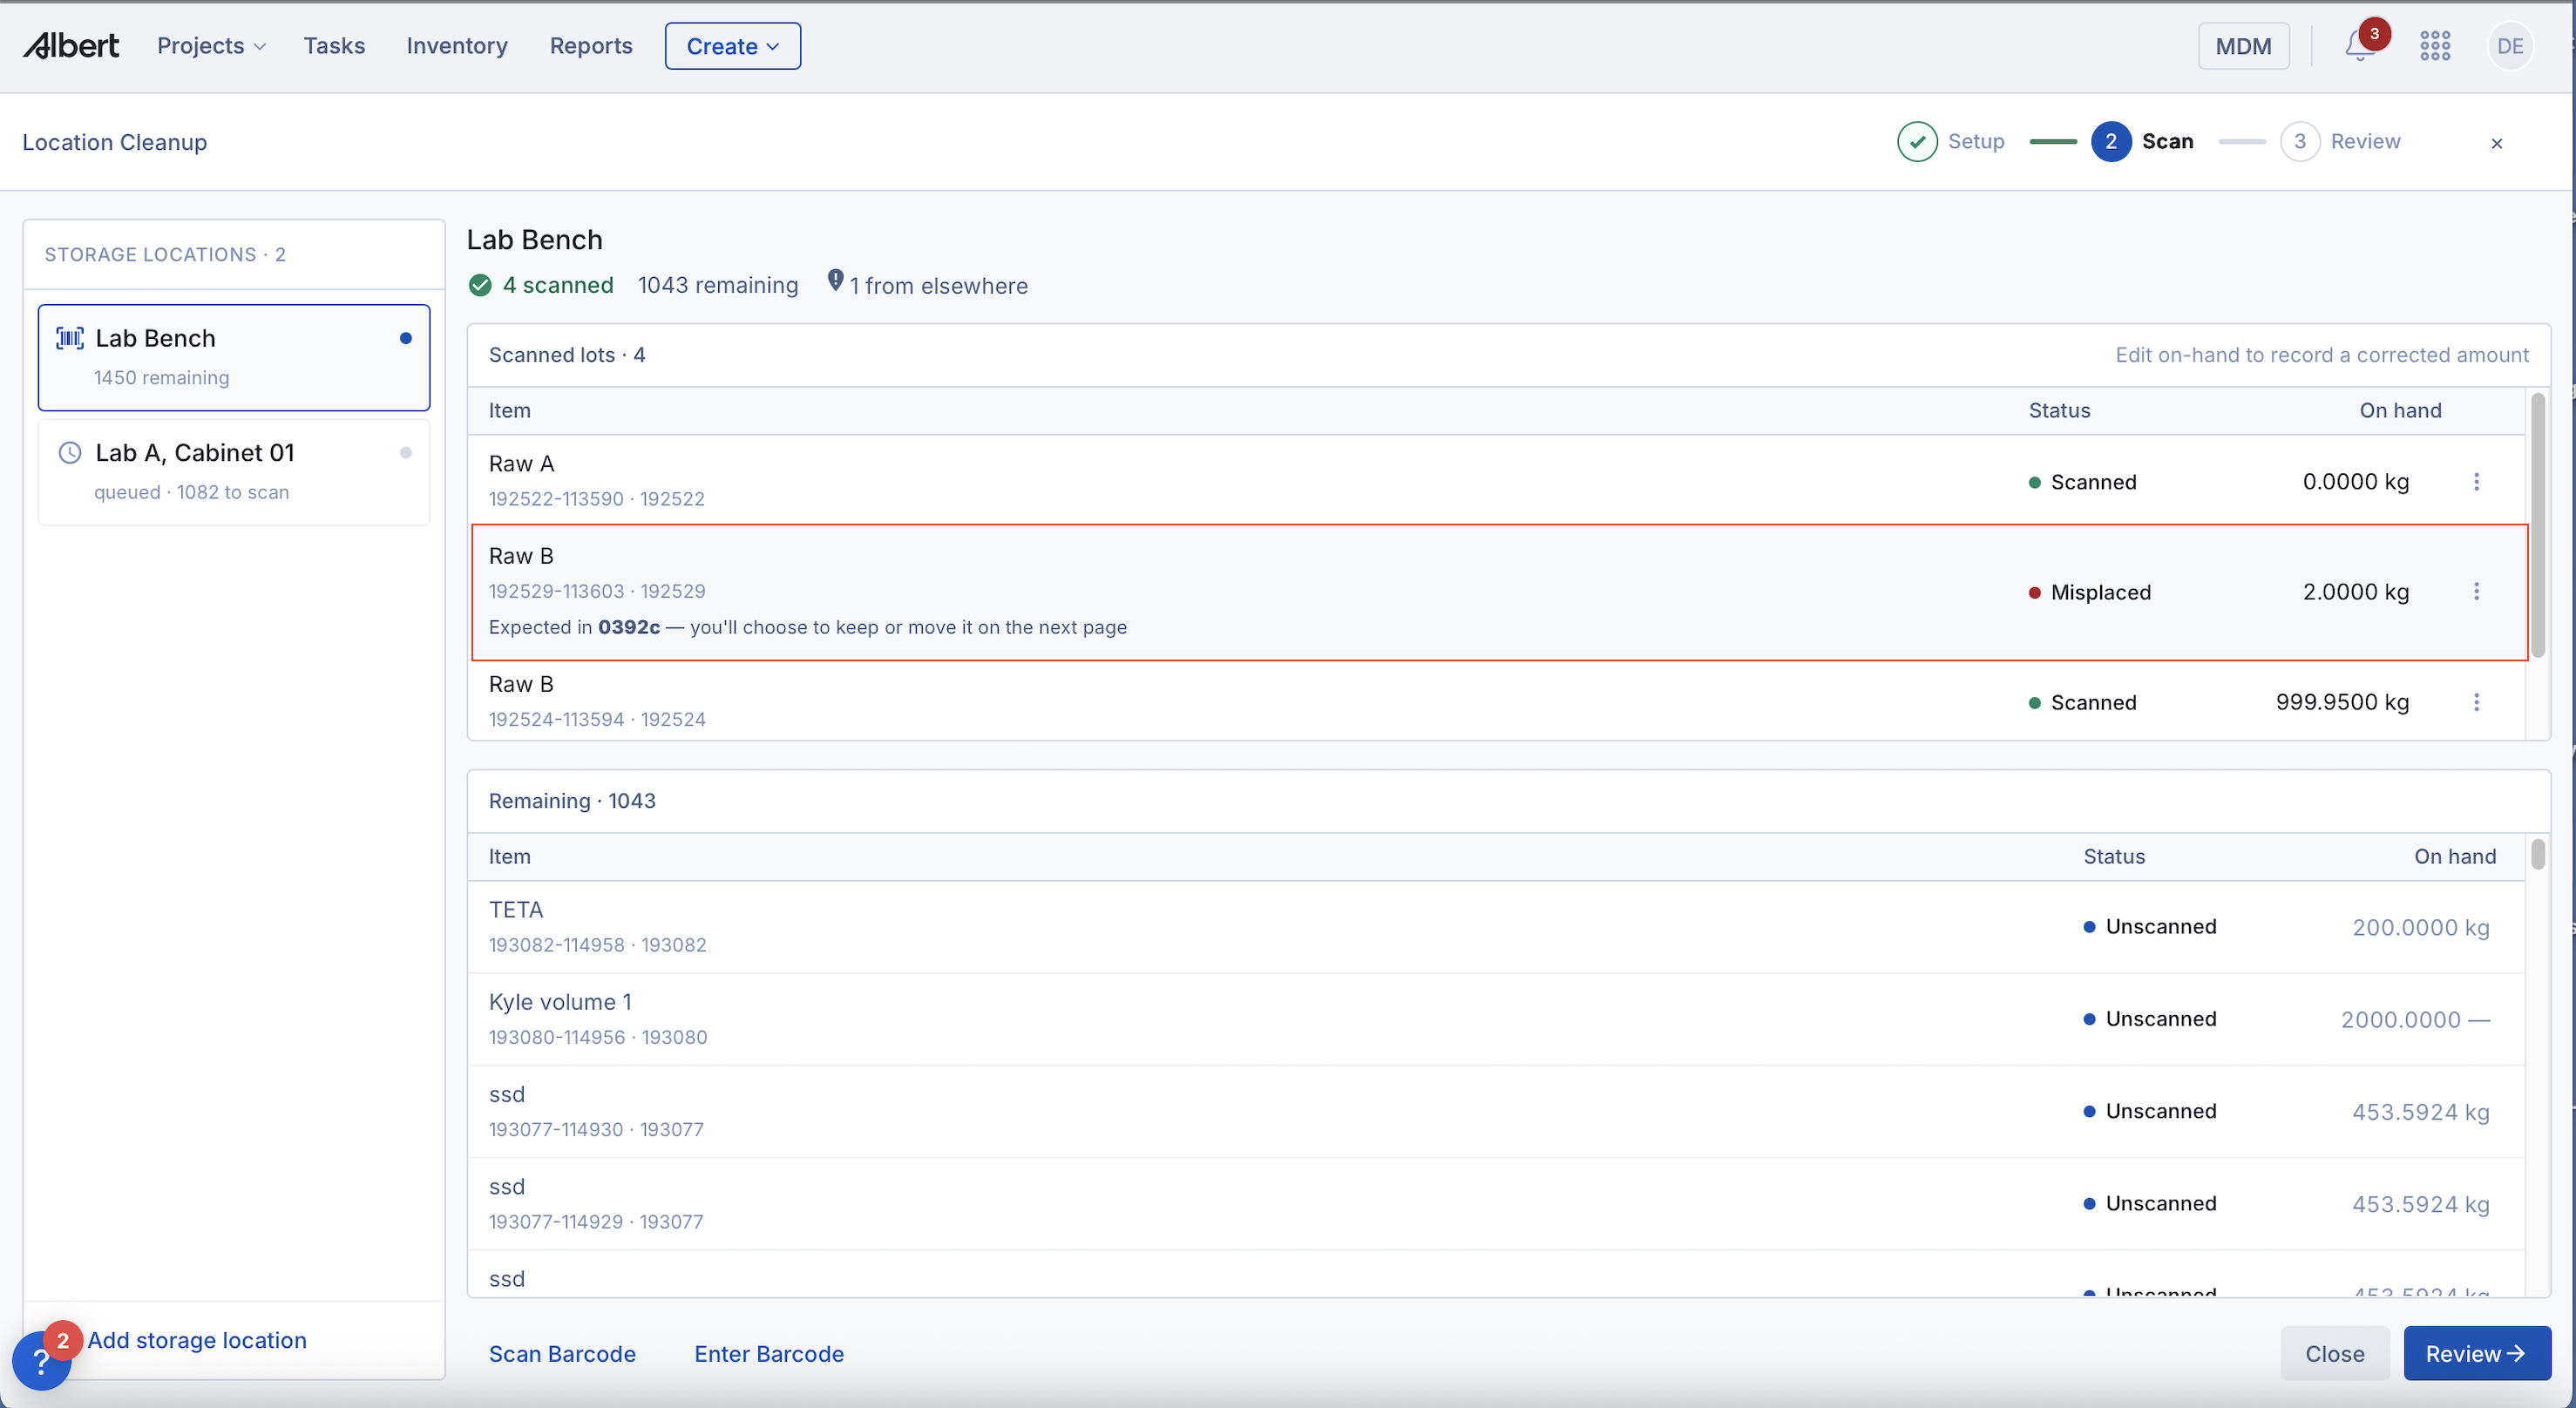
Handling items during scan:
Scanned correctly (green): Item is in the expected location
Misplaced (red): Item found in a different location than Albert's records show
Unscanned (blue): Item expected in this location but not yet scanned
Quick actions while scanning:
Click the three-dot menu next to any scanned item to:
Redownload label
Quarantine
Zero out
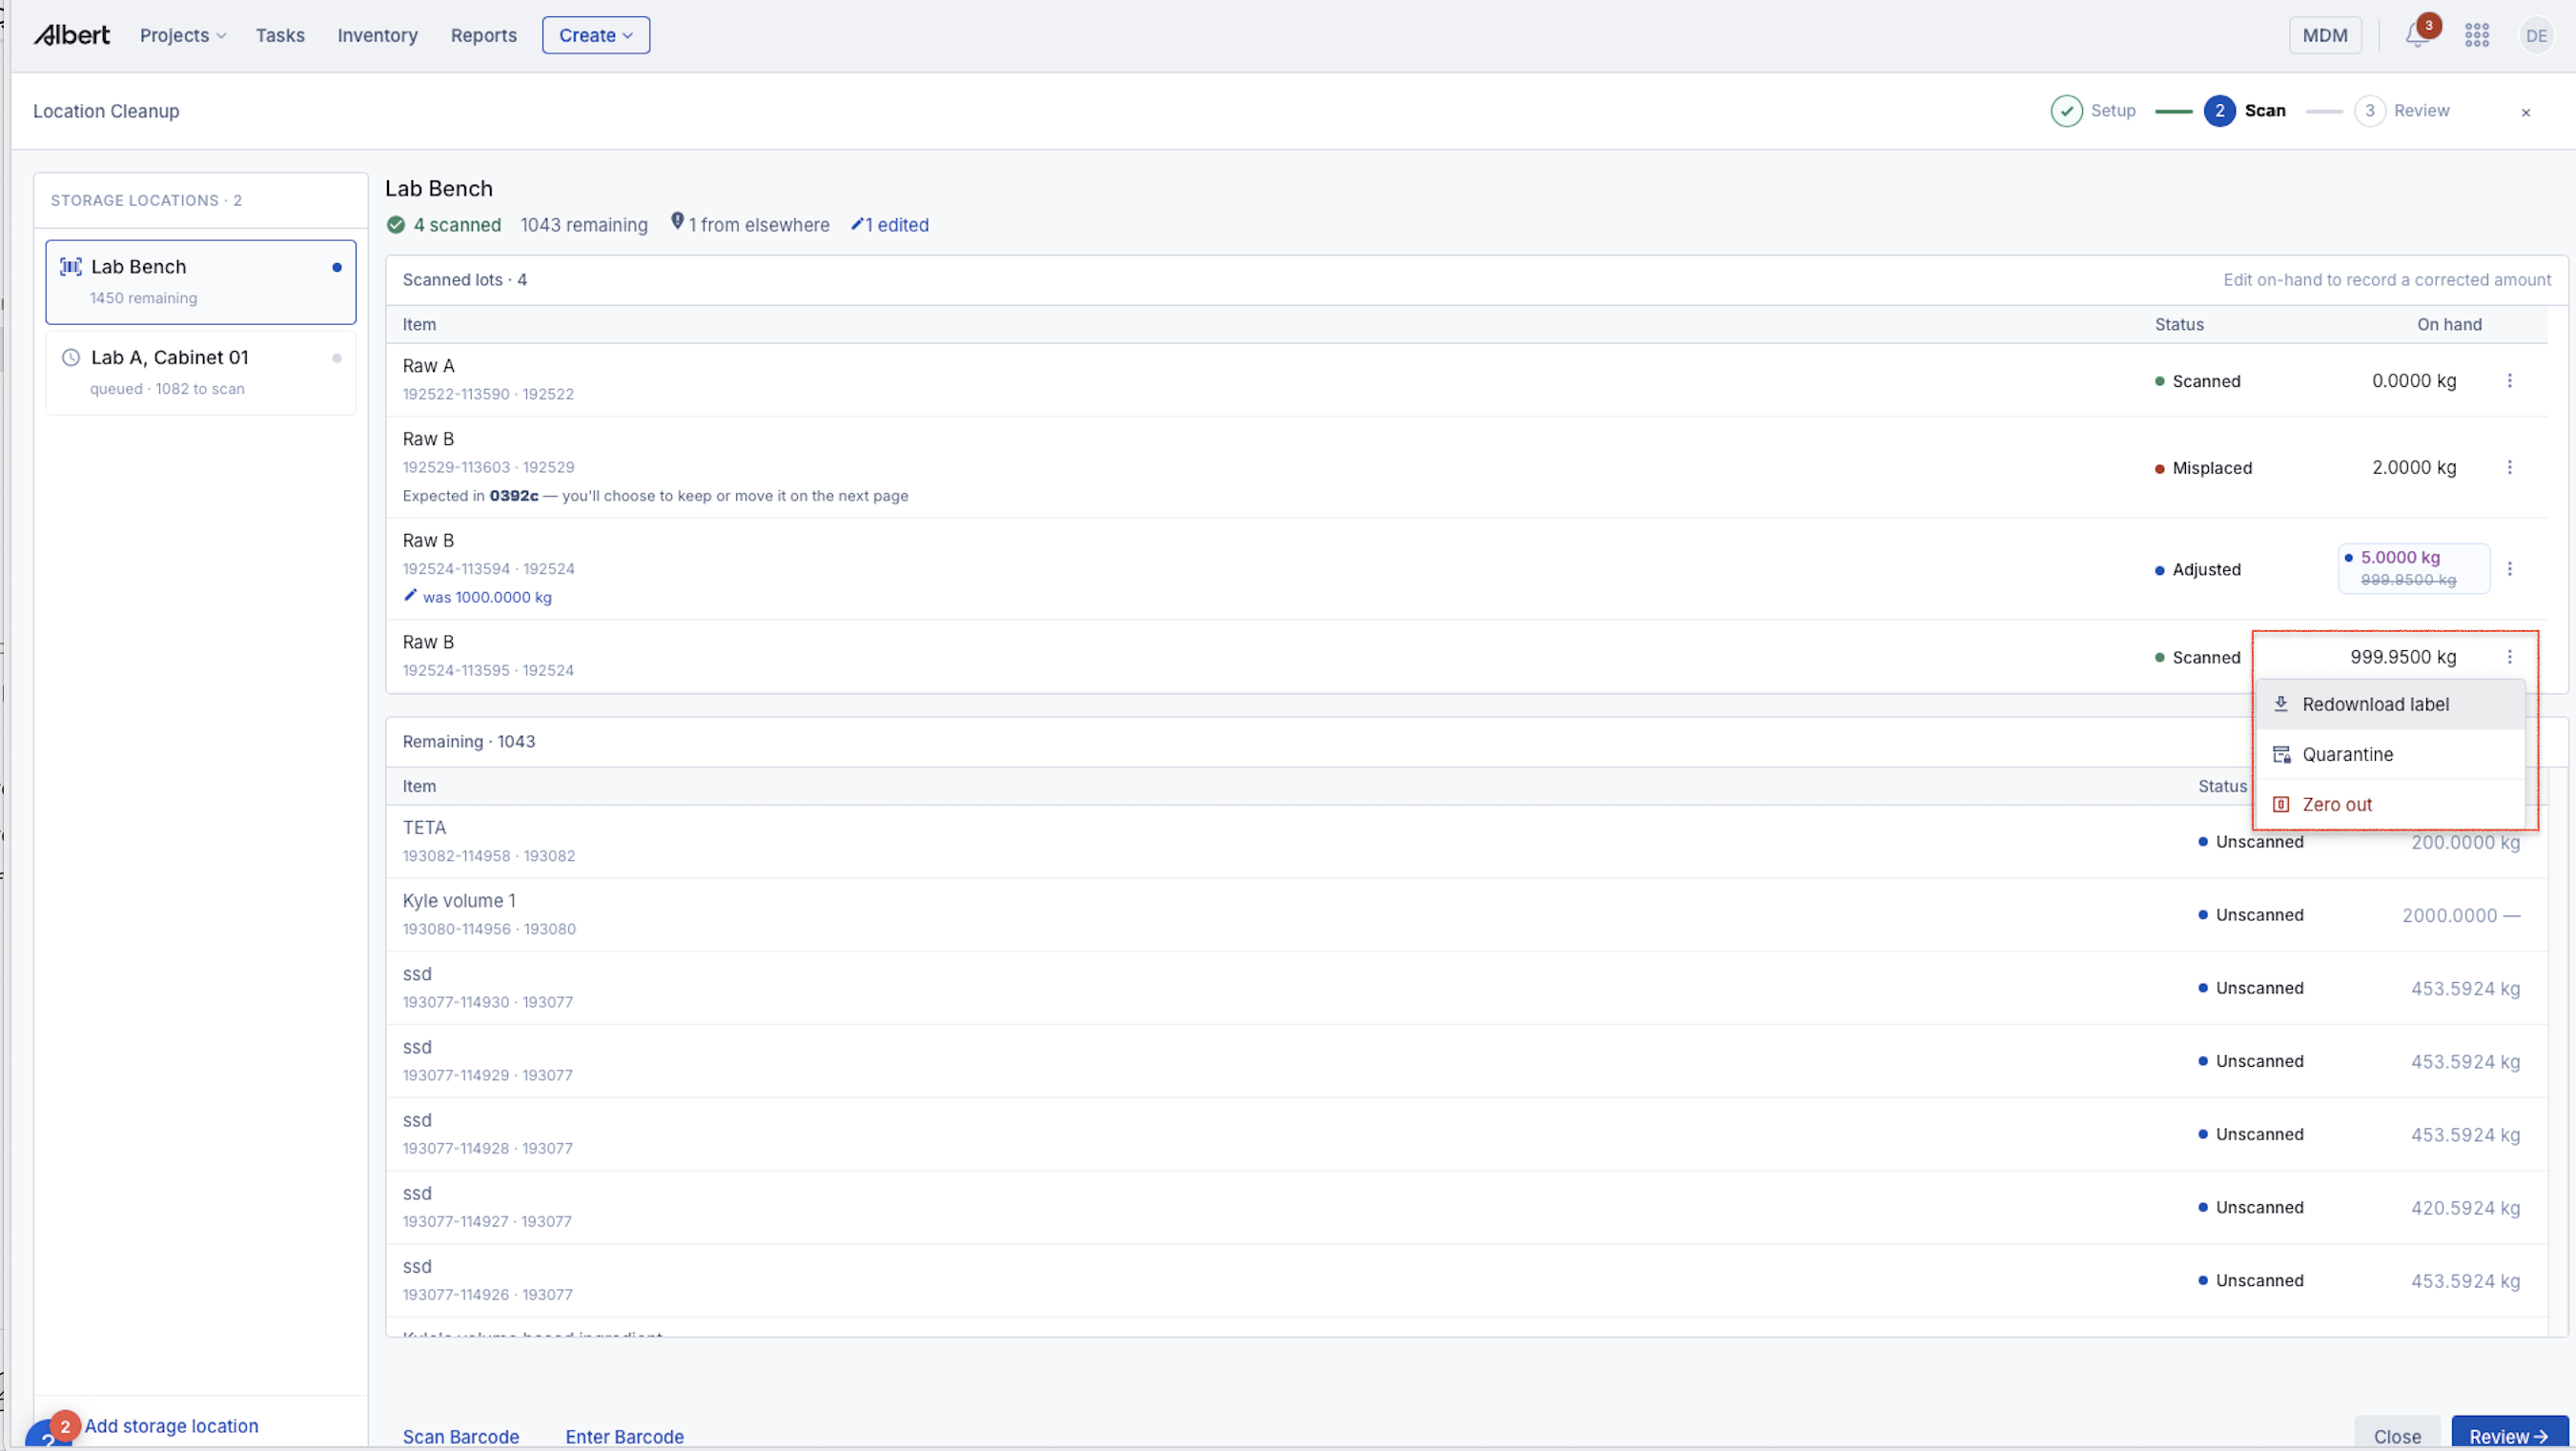
Edit on-hand quantities:
Click directly on the quantity field to correct amounts. If Albert shows 1000 kg but you physically have 5 kg, edit to "5" to record the accurate count.
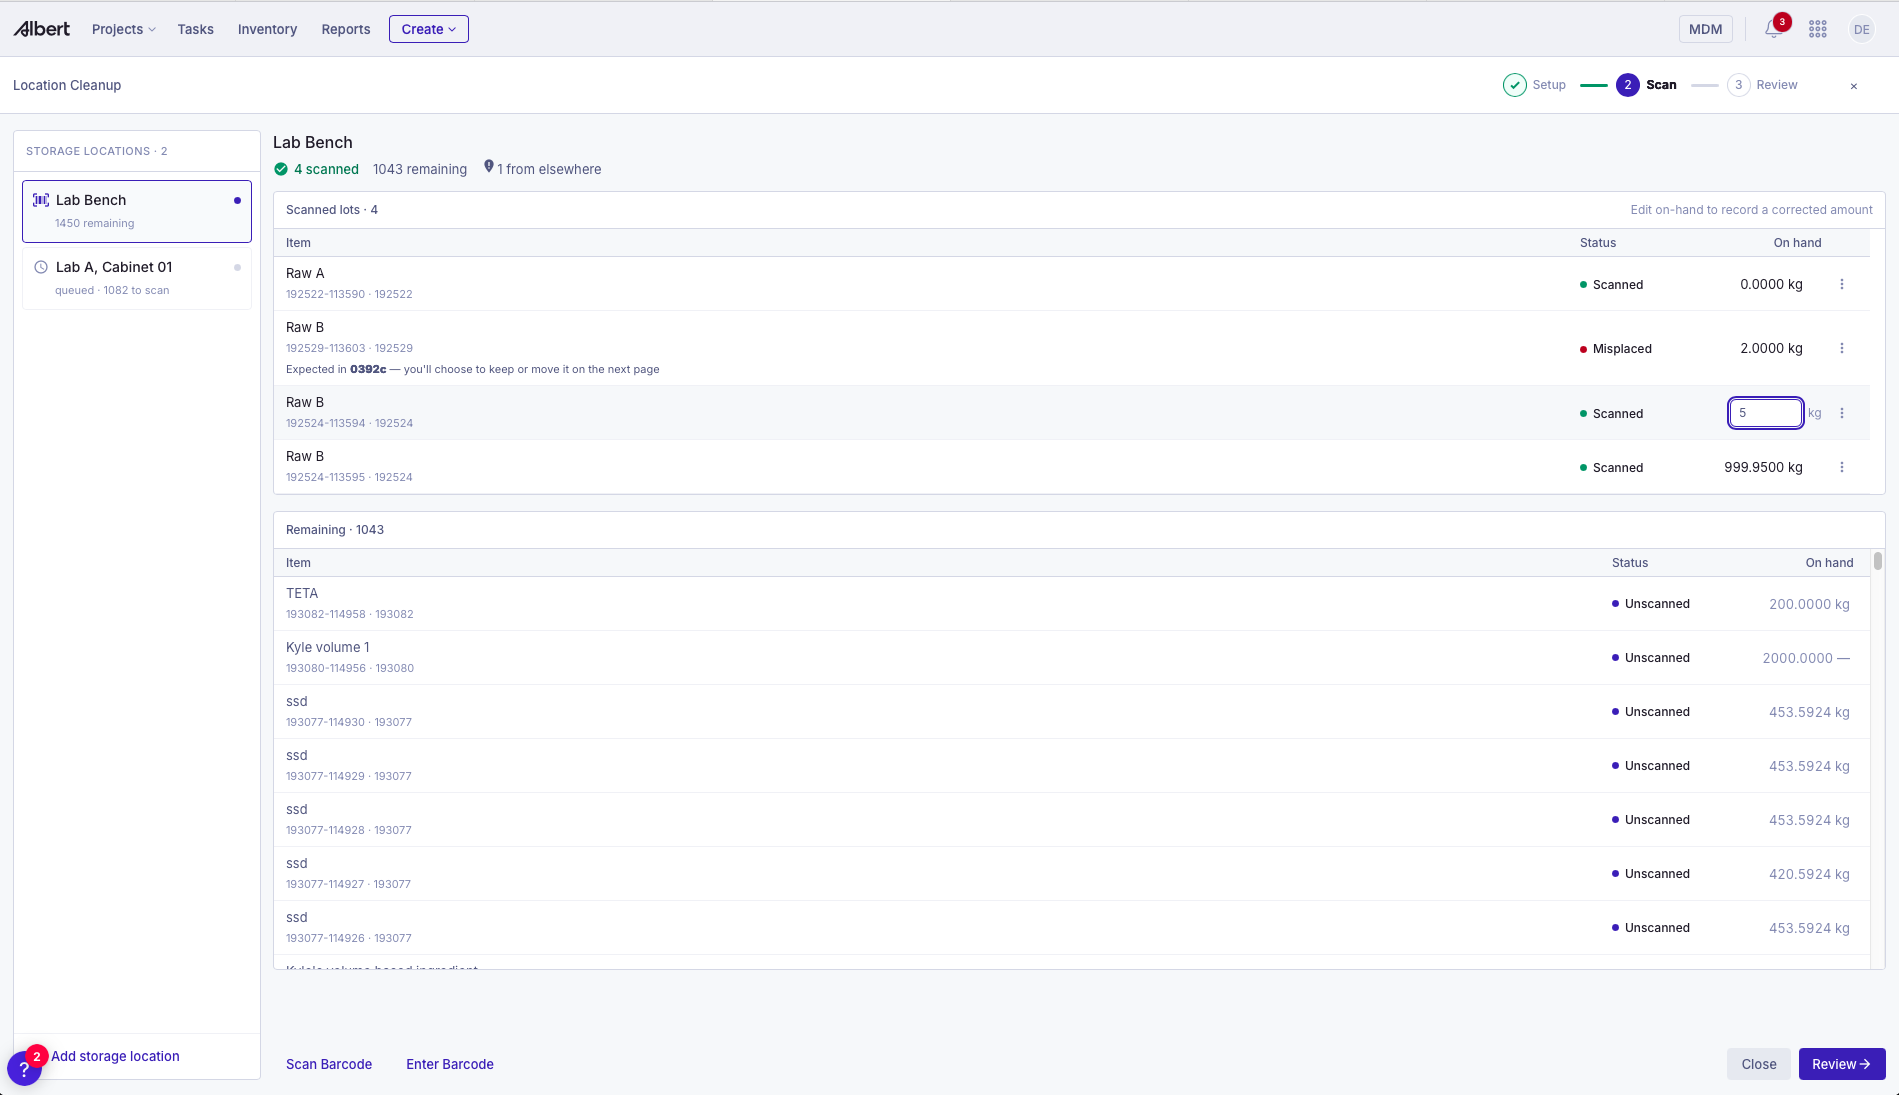
As you scan, items move to the top, and the "remaining" count decreases. Once all physically present items are scanned, click Review to proceed.
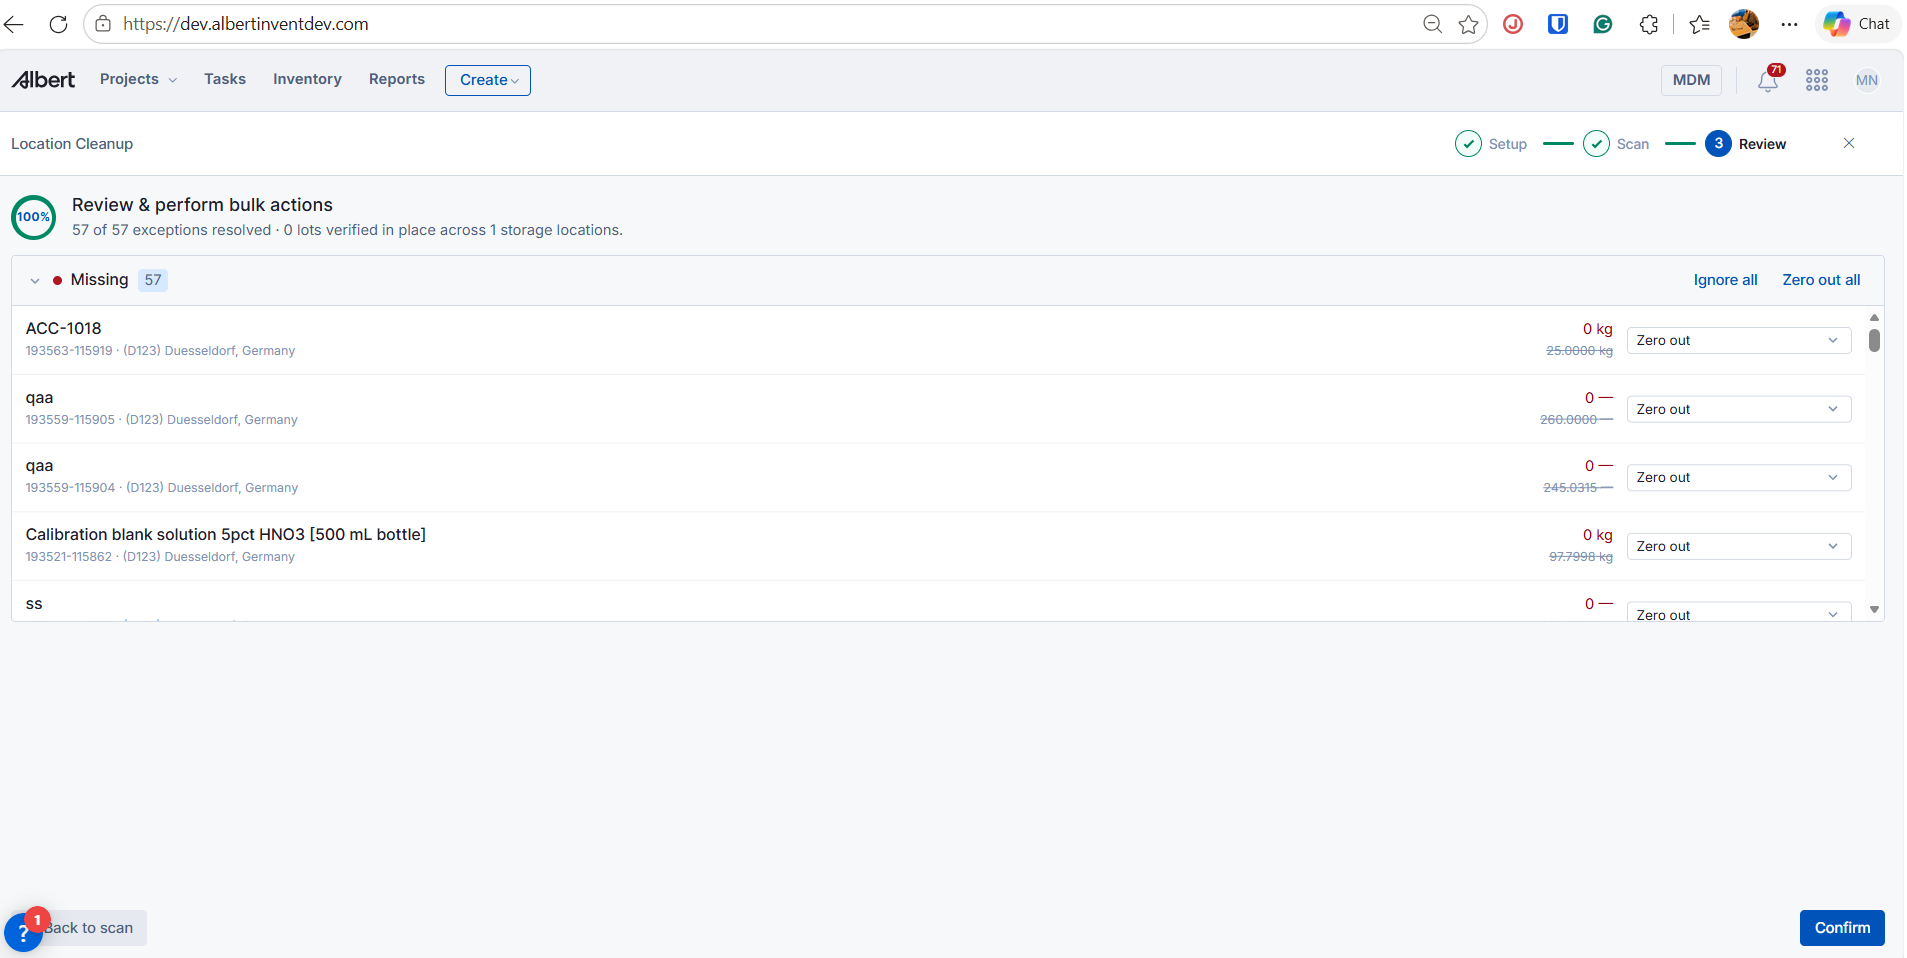
Step 3: Review & Perform Bulk Actions
The Review summary shows three exception categories:
Misplaced items (red): Lots scanned but found in wrong locations
Transfer here: Move them to the correct location
Ignore: Skip and investigate later
Transfer all: Handle multiple misplaced items at once
Adjusted items: On-hand quantities you corrected during the Scan step
Apply: Confirm the quantity changes
Apply all: Apply all adjusted quantities at once
Missing items: Lots recorded in Albert for this location that you didn't scan (physically missing or misplaced)
Zero out: Mark the lot as depleted
Ignore: Skip the item and leave it as-is in Albert (useful if you plan to investigate later)
Zero out all: Zero out all missing items
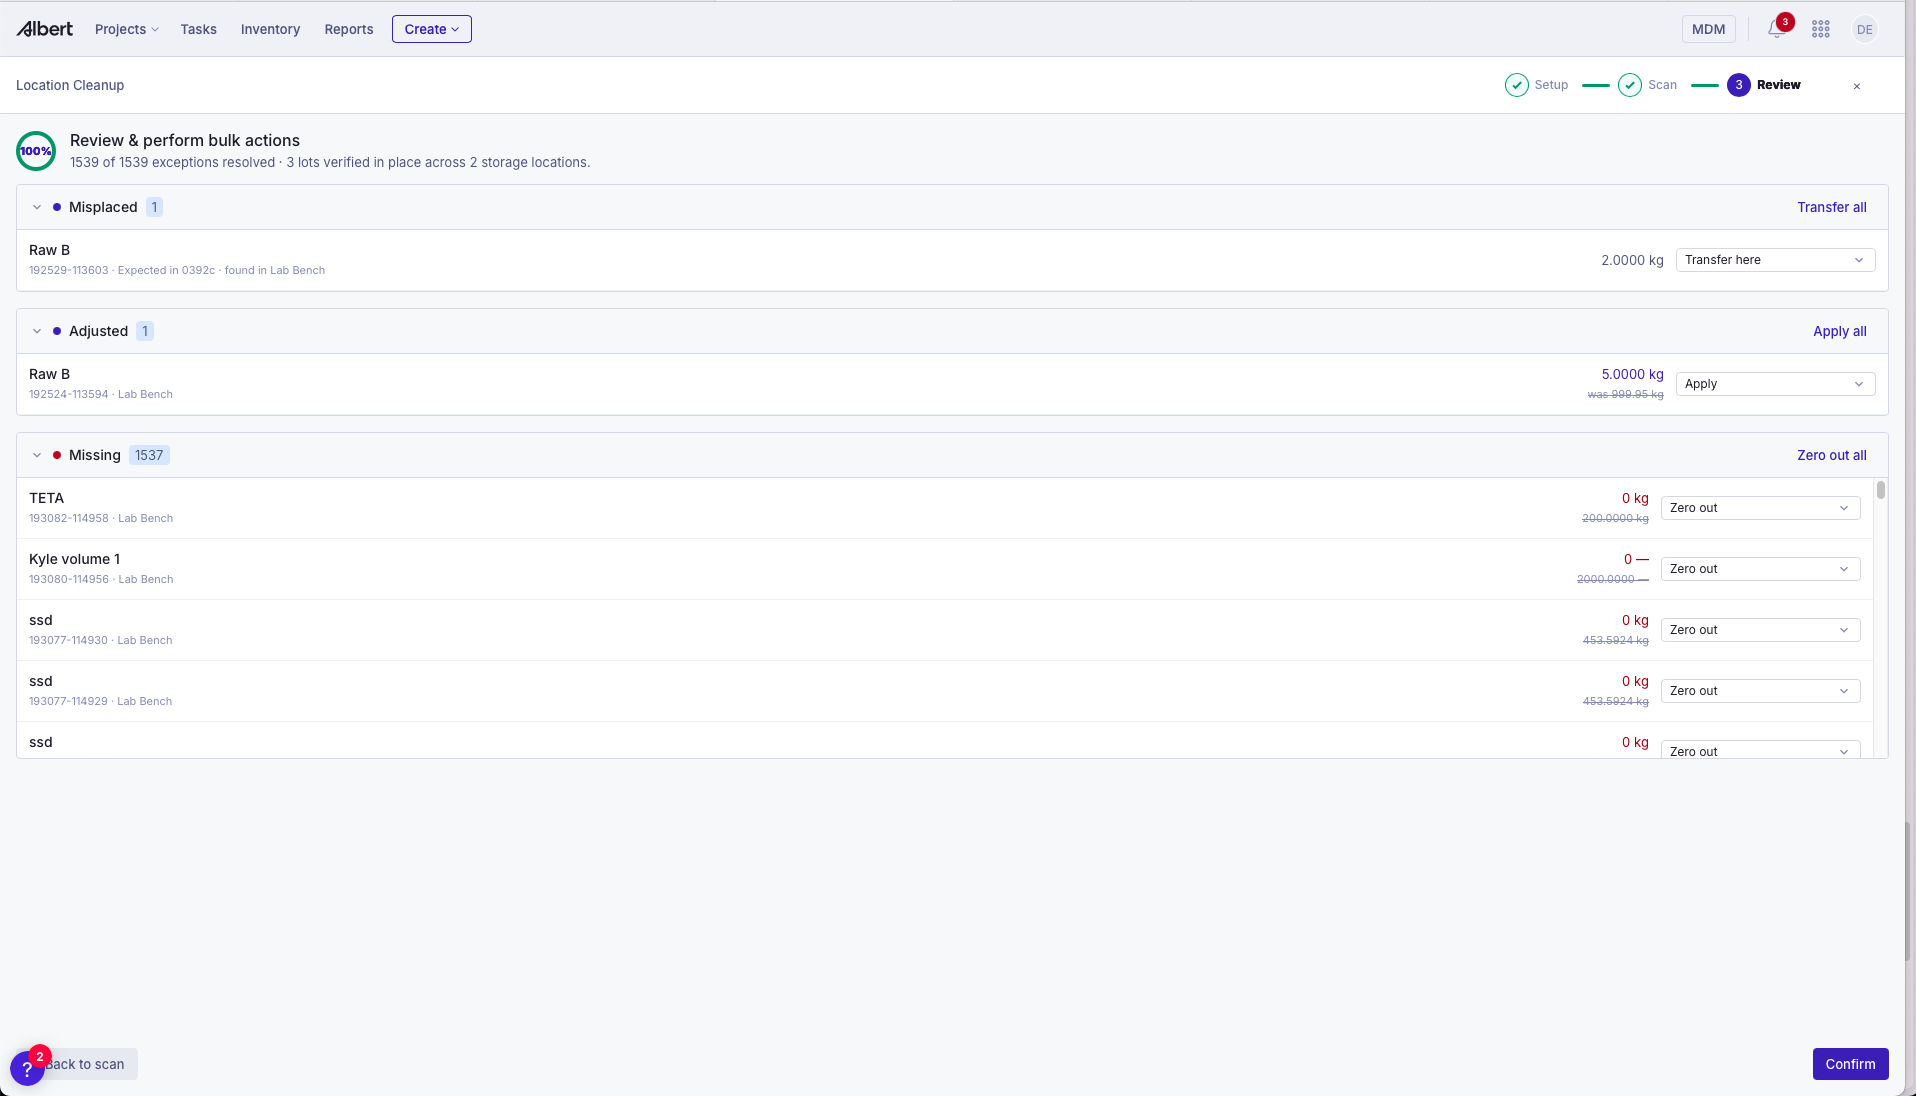
For each exception category, select your action from the dropdown, then click Confirm to finalize all updates.
A success message will appear confirming the reconciliation is complete.
Note: You will need the appropriate permissions to perform these edits in Albert.
Best Practices
Use barcode scanning during physical audits for faster, more reliable results.
Periodically perform Storage Location Cleanup to ensure digital records match actual lab stock.
Before finalizing, always review the summary screen—it clearly shows which lots are being zeroed out or ignored.
Use Zero Out instead of deleting lots; this preserves historical tracking for audits and compliance.
If a lot is found in the wrong location, use the standalone Transfer tab to move it to the correct location.
Example Use Cases
Zero out all expired reagents after monthly lab review.
During monthly inventory checks, perform Location Cleanup to scan present items and verify what's physically there. Any expired reagents you don't scan will appear as missing, then bulk zero them out before sending for disposal, keeping records clean and compliant.Reconcile a storage area after relocation or reorganization.
After moving equipment or reorganizing your lab, perform a storage location cleanup to verify all materials are in their assigned locations. Scan each item to confirm presence, then zero out any that are missing or no longer available.Transfer mislabeled or misplaced items to correct locations.
If during cleanup you find a lot stored in the wrong location, use the standalone Transfer tab to move it to the correct location in bulk with other items.Annual or regulatory compliance audit
Your facility is required to physically verify every chemical on a set schedule. Select your facility location, pick all relevant storage areas, and walk the lab with a scanner. Albert tracks what you've confirmed, flags anything unexpected, and lets you resolve every discrepancy before you close out — producing an up-to-date record without a separate data-entry step afterward.Resolving labeling issues during the audit
A barcode won't scan — the label is torn or faded. Type the lot number in manually and reprint the label immediately from the three-dot menu. The lot is captured in the audit, and the label is fixed before you move to the next shelf.
Frequently asked questions
What's the difference between Location Cleanup and the standalone Zero Out or Transfer tabs?
Zero Out and Transfer are quick single-purpose actions — use them when you already know exactly which lots need to be zeroed or moved. Location Cleanup is for physical audits where you're walking a space and need to reconcile everything in it: confirming presence, correcting quantities, flagging issues, and resolving discrepancies all in one workflow.How many storage locations can I include in one cleanup session?
You can select up to 20 storage locations within a single facility location per session. If you have more than 20, run additional sessions for the remaining areas.What happens to lots I don't scan?
Lots that Albert expects in your selected storage locations but that you don't scan during the session appear as Missing on the Review page. From there you can zero them out individually, zero out all at once, or leave them as-is if you plan to investigate further.Can I pause and come back to a cleanup session mid-audit?
We recommend completing the full scan in one session where possible. If you need to step away, avoid closing the workflow before reaching the Review step, as unsaved progress may be lost.What does quarantining a lot do?
Quarantining flags a lot as unsuitable for use — for example, if it's degraded, out of spec, or contaminated. The lot remains in Albert's records but is marked so it won't be inadvertently used in formulations or experiments. Quarantined lots appear as their own category on the Review page.If I accidentally zero out a lot, can I undo it?
Zero-out actions update the on-hand quantity to zero but do not delete the lot from Albert. Contact your administrator or the Albert support team to restore the quantity if needed.What permissions do I need to run a Location Cleanup?
You need inventory edit permissions for the locations you're auditing. If you're unable to access Bulk Update Lots or make changes during a session, contact your Albert administrator to confirm your permission level.Can I reprint a lot label if the barcode is damaged?
Yes. During the Scan step, click the three-dot menu next to any scanned lot and select Redownload label to reprint it on the spot.What's the difference between Misplaced and Missing?
A Misplaced lot was physically scanned during your session but in a location different from where Albert's records say it should be. A Missing lot was never scanned at all during the session — it could be physically absent, stored somewhere outside your selected locations, or simply not encountered during the walk.